Mokkapalat, nuo koulumyyjäisten ja lastenjuhlien ikisuosikit! Muistan itse syöneeni mokkapaloja kotona, kavereiden synttäreillä, kerhojen myyjäisissä ja urheilutapahtumien kahvioissa. Aikuisiällä olen bongannut sen myös luistelukisoista, joten herkku on pitänyt oikeutetusti pintansa. Olen saanut osakseni sekä todella hyviä että kaikki odotukset pettäneitä paloja. Aika ehkä kultaa muistot, mutta paria reseptiä kokeiltuani (ja petyttyäni karvaasti) päätin, että ehkä tämä leivonnainen kuuluu samaan kategoriaan sen pullan kanssa - toiset osaa, minä en. Lisäksi kun kyseessä on niin vahvasti makumieltymyksiin perustuva klassikko, on epäonnistumisen mahdollisuus ollut epämiellyttävän suuri.
Mutta voi onnen päivä! Löysin puolivahingossa lupaavan oloisen reseptin, jota pienensin ja muokkasin parin testileivonnan myötä ja lopputuloksena sain minusta parhaat mokkapalat, joita olen maistanut. Mehevä pohja, jossa on hyvä rakenne, reilu kuorrutus (jota tosin ei voi koskaan olla liikaa) ja omaan suuhun sopiva kahvinmaku.
Huom! Reseptistä tulee pieni annos, yksi 20x20 vuoallinen.
2 M-koon kananmunaa, huoneenlämpöisenä
2,6dl Siro-sokeria
2,3dl kakkuvehnäjauhoja
4rkl leivontakaakaota
2tl pikaespressojauhetta
1,2tl vaniljasokeria
1,2tl leivinjauhetta
1,2dl maitoa, huoneenlämpöisenä tai haaleana
120g voita, sulatettuna
Vaahdota huoneenlämpöiset kananmunat ja sokeri paksuksi, vaaleaksi vaahdoksi (n. 5min). Sekoita keskenään jauhot, kaakao, espresso, vaniljasokeri ja leivinjauhe, ja sihtaa seos vaahdon joukkoon vuorotellen maidon kanssa kevyesti vatkaten. Lisää lopuksi voisula kevyesti vatkaten. Paista 20x20 vuoassa 225-asteisen uunin keskitasolla 10-15 minuuttia uunista riippuen. Minun pohja oli juuri sopiva 12 minuutin jälkeen. Valmista kuorrute pohjan jäähtyessä.
45g voita
160g tomusokeria
2rkl leivontakaakaota
1tl vaniljasokeria
3rkl vahvaa kahvia
Sulata voi pienessä kattilassa. Sihtaa tomusokeri, kaakao ja vaniljasokeri keskenään sekaisin ja lisää voisulaan. Lisää lopuksi kahvi vähän kerrallaan koko ajan sekoittaen, kunnes seos on sileää ja kiiltävää. Kahvia ei välttämättä tarvita koko määrää. Levitä kuorrute lämpimän pohjan päälle ja koristele heti esim nonparelleilla tai kookoshiutaleilla. Koristeet eivät tartu kuorrutuksen pintaan enää myöhemmin. Anna jäähtyä, ja jos maltat, pidä hetki jääkaapissa, jotta paloja on helpompi leikata.
Mittavinkki: 1rkl = 15ml, 1tl = 5ml ja 1mm = 1ml. Eli esim 2,6dl = 2dl + 4rkl.
In English:
Mocha Chocolate Squares
These mocha chocolate squares are a stable bake sale classic in Finland. You have them at kids' parties, sports events etc. I've had my share of good and not so good slices, and sadly both of my earlier baking attempts ended up in the latter category. So, because I don't deal with failure that well, I decided not to bake them. No disappointments but no cake, either.
But oh, happy day! I sort of accidentally found a promising recipe, sized it down and changed it to some extent with a few testing rounds and here it is. The cake base is moist and the texture is good, there's almost enough frosting on top (there can never be enough, right?) and the coffee flavour is just right.
2 medium-sized eggs, at room temperature
2,6dl superfine sugar
2,3dl (cake) flour
4rkl dark cocoa powder
2 teaspoons instant espresso powder
1,2 teaspoons vanilla sugar
1,2 teaspoons baking powder
1,2dl milk, at room temperature or lukewarm
120g butter, melted
Preheat oven to 225*C. Whisk the eggs and sugar until light and fluffy (about 5 minutes). Mix together the flour, cocoa, espresso, vanilla sugar and baking powder and whisking lightly, sift the dry ingredients into the egg mixture, alternating with the milk. Finally add the melted butter while whisking lightly. Pour the batter into a lined 20x20cm brownie pan and bake in the middle of the oven for 10-15 minutes, depending on the oven. Mine was done in 12 minutes. Prepare the frosting while the cake cools.
45g butter
160g powdered sugar
2 tablespoons dark cocoa powder
1 teaspoon vanilla sugar
3 tablespoons strong coffee
Melt the butter in a small saucepan. Sift together the sugar, cocoa and vanilla and add the mixture into the melted butter. Whisk in the coffee, just little bit at a time, until the mixture is smooth and glossy. You might not need all the coffee. Pour the frosting on top of the warm cake and garnish with e.g. sprinkles or coconut flour. The garnish won't stick later on. Let the cake cool down and if you have some self-control, keep in the fridge for a while, so it's easier to slice.
Measurement tip: 1 tablespoon = 15ml, 1 teaspoon = 5ml. So e.g. 2,6dl = 2dl + 4 tablespoons.
Näytetään tekstit, joissa on tunniste baking. Näytä kaikki tekstit
18. kesäkuuta 2018
28. toukokuuta 2017
Puolukka-valkosuklaamuffinsit
Näin kesän alkaessa tulee viimeistään hinku tyhjentää pakastin viime vuoden marjoista. Herukoita ja mustikoita on mennyt niin vispipuuroon kuin smoothieen. Mansikat on käytetty, ja niitä odotankin kovasti. Puolukat olen ostanut kaupasta, kotimaisia on onneksi tarjolla vuoden ympäri. Leivonnassa olen ollut aika huono käyttämään puolukkaa, mutta valkosuklaan kaverina se oli mukavan kirpsakka ja mehevä. Mehevyys tosin tulee myös reilusta suklaan määrästä, mutta sehän nyt ei koskaan ole pahitteeksi... Tästä reseptistä tulee 6-7 isoa muffinsia.
50g voita sulatettuna
70g luonnonjogurttia
1 M-koon kananmuna
50g valkosuklaata
1,5dl + 1rkl vehnäjauhoja (osittain tai kokonaan täysjyvävehnää)
0,5dl + 2rkl ruokosokeria
1tl vaniljasokeria
vajaa 1tl leivinjauhetta
70g puolukkaa
30g valkosuklaata
Vispaa jäähtynyt sulatettu voi, jogurtti ja kananmuna sekaisin. Rouhi 50g valkosuklaata melko pieneksi (tai käytä valmiita nappeja/chipsejä). Sekoita suklaarouhe, jauhot, sokeri, vaniljasokeri ja leivinjauhe keskenään sekaisin, ja kääntele sitten jogurttiseokseen. Lisää lopuksi puolukat ja kääntele varovasti sekaisin. Lusikoi taikina isoihin muffinsivuokiin ja pilko päälle 30g valkosuklaata melko isoina paloina. Ideana on antaa suklaan paahtua muffinsien pinnalle. Paista muffinseja 175-asteisen uunin keskitasossa noin 25 minuuttia, uunista riippuen. Tarjoile lämpöisinä esim jäätelön kanssa tai jäähtyneinä vaikka aamiaisella.
In English:
Lingonberry muffins with white chocolate
Now that summer is finally here (or pretty close, at least), I've been using up my berry storage from freezer as much as possible. There are still plenty of currants left but strawberries are gone and blueberries (or bilberries) almost, too. I've been buying the lingonberries (cowberries) since domestic kind is thankfully available year round. Smoothies and porridge have been main targets for those but I finally used some in baking. What a lovely combo with white chocolate! This recipe yields 6-7 big muffins.
50g butter, melted
70g natural yoghurt
1 egg
50g white chocolate (bar or chips)
1,5dl + 1 tablespoon flour (whole wheat)
0,5dl + 2 tablespoons fine cane sugar (or brown sugar)
1 teaspoon vanilla sugar
scant 1 teaspoon baking powder
70g lingonberries (cowberries)
30g white chocolate (bar or chips)
Preheat oven to 175*C. Whisk the melted butter, yoghurt and egg together. Chop 50g of the white chocolate if you're not using chips. Combine that chocolate with flour, sugar, vanilla sugar and baking powder and fold into the yoghurt mixture. Finally, add the lingonberries and carefully fold until well combined. Spoon the batter into prepared muffin pan and add the 30g of white cocolate on top (either roughly chopped or chips). The idea is for the white chocolate to get roasted on top of the muffins. Bake in the middle of the oven for about 25 minutes, depending on the oven. Serve these muffins warm with ice cream or (for example) as part of brunchy breakfast.
50g voita sulatettuna
70g luonnonjogurttia
1 M-koon kananmuna
50g valkosuklaata
1,5dl + 1rkl vehnäjauhoja (osittain tai kokonaan täysjyvävehnää)
0,5dl + 2rkl ruokosokeria
1tl vaniljasokeria
vajaa 1tl leivinjauhetta
70g puolukkaa
30g valkosuklaata
Vispaa jäähtynyt sulatettu voi, jogurtti ja kananmuna sekaisin. Rouhi 50g valkosuklaata melko pieneksi (tai käytä valmiita nappeja/chipsejä). Sekoita suklaarouhe, jauhot, sokeri, vaniljasokeri ja leivinjauhe keskenään sekaisin, ja kääntele sitten jogurttiseokseen. Lisää lopuksi puolukat ja kääntele varovasti sekaisin. Lusikoi taikina isoihin muffinsivuokiin ja pilko päälle 30g valkosuklaata melko isoina paloina. Ideana on antaa suklaan paahtua muffinsien pinnalle. Paista muffinseja 175-asteisen uunin keskitasossa noin 25 minuuttia, uunista riippuen. Tarjoile lämpöisinä esim jäätelön kanssa tai jäähtyneinä vaikka aamiaisella.
In English:
Lingonberry muffins with white chocolate
Now that summer is finally here (or pretty close, at least), I've been using up my berry storage from freezer as much as possible. There are still plenty of currants left but strawberries are gone and blueberries (or bilberries) almost, too. I've been buying the lingonberries (cowberries) since domestic kind is thankfully available year round. Smoothies and porridge have been main targets for those but I finally used some in baking. What a lovely combo with white chocolate! This recipe yields 6-7 big muffins.
50g butter, melted
70g natural yoghurt
1 egg
50g white chocolate (bar or chips)
1,5dl + 1 tablespoon flour (whole wheat)
0,5dl + 2 tablespoons fine cane sugar (or brown sugar)
1 teaspoon vanilla sugar
scant 1 teaspoon baking powder
70g lingonberries (cowberries)
30g white chocolate (bar or chips)
Preheat oven to 175*C. Whisk the melted butter, yoghurt and egg together. Chop 50g of the white chocolate if you're not using chips. Combine that chocolate with flour, sugar, vanilla sugar and baking powder and fold into the yoghurt mixture. Finally, add the lingonberries and carefully fold until well combined. Spoon the batter into prepared muffin pan and add the 30g of white cocolate on top (either roughly chopped or chips). The idea is for the white chocolate to get roasted on top of the muffins. Bake in the middle of the oven for about 25 minutes, depending on the oven. Serve these muffins warm with ice cream or (for example) as part of brunchy breakfast.
15. toukokuuta 2017
Pienet strösselikakut
Tätä blogia lukeville on varmasti käynyt jo ilmi, että fanitan Christina Lanen Dessert for Two -blogia todella paljon ja keittokirjat ovat aika usein käytössä tai ainakin inspiraation lähteenä. Viimeisin Christinan mahtava idea on annoskakut, koska kuka nyt ei olisi iloinen saadessaan kokonaan oman kakun?! Ja vielä sellaisen järkevän kokoisen. Ja kun kakku on kyllästetty värikkäillä strösseleillä, on päivän piristys taattu!
1 L-koon kananmuna
3rkl sokeria
3rkl rypsi- tai auringonkukkaöljyä
1tl vaniljauutetta
1,2dl vehnäjauhoja
0,5tl leivinjauhetta
reilu ripaus suolaa
2rkl maitoa (tai ruokakermaa)
2rkl värikkäitä strösseleitä
Vatkaa kananmuna, sokeri, öljy ja vanilja hyvin sekaisin. Sekoita keskenään vehnäjauhot, leivinjauhe ja suola, ja lisää kuivat aineet munaseokseen kahdessa erässä, maidon/ruokakerman kanssa vuorotellen. Kääntele lopuksi strösselit varovasti taikinaan ja jaa taikina kahteen hyvinvoideltuun annosvuokaan. Paista 175-asteisen uunin keskitasossa noin 25-30 minuuttia uunista riippuen. Anna jäähtyä kokonaan.
100g tuorejuustoa
1-2rkl tomusokeria
1 rkl värikkäitä strösseleitä
Sekoita tuorejuusto ja sokeri hyvin sekaisin. Lisää strösselit sekaan juuri ennen tarjoilua ja lusikoi juustoseos kakkusten päälle. Maustamaton tuorejuusto on klassikkokuorrute, mutta esim kinuski- ja sitruunatuorejuustoilla saa kivaa vaihtelua! Huomioi, että maustettujen tuorejuustojen kanssa sokeria ei tarvita.
In English:
Tiny Funfetti Cakes
If you've read my blog you know that I love Christina Lane's Dessert for Two. Both the blog and her cookbooks. Her latest thing is ramekin-sized cakes, and why is that so great? Well, who wouldn't love to have a whole cake (and in a reasonably size that makes it possible to fit into those jeans tomorrow, as well)! And no matter how bad Monday blues or some other day blues you have, sprikles always make everything better. True story.
1 large egg
3 tablespoons sugar
3 tablespoons canola or sunflower oil
1 teaspoon vanilla extract
0,5 cup / 1,2dl all-purpose flour
0,5 teaspoon baking powder
big pinch of salt
2 tablespoons milk (or light/single cream)
2 tablespoons sprinkles
Preheat oven to 175*C and prepare the ramekins with cooking spray or canola/sunflower oil. Whisk together the egg, sugar, oil and vanilla. Mix the flour, baking powder and salt in a separate bowl and add the dry ingredients to the wet ones in two batches, alternating with the milk / cream. Once the batter is smooth, gently fold the sprinkles to the batter and divide into two ramekins. Bake in the middle of the oven for 25-30 minutes, depending on the oven. Let cool completely.
100g cream cheese
1-2 tablespoons powdered sugar
1 tablespoon sprinkles
Mix the cream cheese and sugar. Fold in the sprikles just before serving and spoon the cheese mixture on top of each cake. If you use a flavoured cream cheese (e.g. caramel or lemon) note that there's no need for sugar then. If you use a thicker cream cheese (block type), add a little splash of milk.
1 L-koon kananmuna
3rkl sokeria
3rkl rypsi- tai auringonkukkaöljyä
1tl vaniljauutetta
1,2dl vehnäjauhoja
0,5tl leivinjauhetta
reilu ripaus suolaa
2rkl maitoa (tai ruokakermaa)
2rkl värikkäitä strösseleitä
Vatkaa kananmuna, sokeri, öljy ja vanilja hyvin sekaisin. Sekoita keskenään vehnäjauhot, leivinjauhe ja suola, ja lisää kuivat aineet munaseokseen kahdessa erässä, maidon/ruokakerman kanssa vuorotellen. Kääntele lopuksi strösselit varovasti taikinaan ja jaa taikina kahteen hyvinvoideltuun annosvuokaan. Paista 175-asteisen uunin keskitasossa noin 25-30 minuuttia uunista riippuen. Anna jäähtyä kokonaan.
100g tuorejuustoa
1-2rkl tomusokeria
1 rkl värikkäitä strösseleitä
Sekoita tuorejuusto ja sokeri hyvin sekaisin. Lisää strösselit sekaan juuri ennen tarjoilua ja lusikoi juustoseos kakkusten päälle. Maustamaton tuorejuusto on klassikkokuorrute, mutta esim kinuski- ja sitruunatuorejuustoilla saa kivaa vaihtelua! Huomioi, että maustettujen tuorejuustojen kanssa sokeria ei tarvita.
In English:
Tiny Funfetti Cakes
If you've read my blog you know that I love Christina Lane's Dessert for Two. Both the blog and her cookbooks. Her latest thing is ramekin-sized cakes, and why is that so great? Well, who wouldn't love to have a whole cake (and in a reasonably size that makes it possible to fit into those jeans tomorrow, as well)! And no matter how bad Monday blues or some other day blues you have, sprikles always make everything better. True story.
1 large egg
3 tablespoons sugar
3 tablespoons canola or sunflower oil
1 teaspoon vanilla extract
0,5 cup / 1,2dl all-purpose flour
0,5 teaspoon baking powder
big pinch of salt
2 tablespoons milk (or light/single cream)
2 tablespoons sprinkles
Preheat oven to 175*C and prepare the ramekins with cooking spray or canola/sunflower oil. Whisk together the egg, sugar, oil and vanilla. Mix the flour, baking powder and salt in a separate bowl and add the dry ingredients to the wet ones in two batches, alternating with the milk / cream. Once the batter is smooth, gently fold the sprinkles to the batter and divide into two ramekins. Bake in the middle of the oven for 25-30 minutes, depending on the oven. Let cool completely.
100g cream cheese
1-2 tablespoons powdered sugar
1 tablespoon sprinkles
Mix the cream cheese and sugar. Fold in the sprikles just before serving and spoon the cheese mixture on top of each cake. If you use a flavoured cream cheese (e.g. caramel or lemon) note that there's no need for sugar then. If you use a thicker cream cheese (block type), add a little splash of milk.
22. tammikuuta 2017
Lemon squares
The recipe for these sweet and tangy lemon squares was originally posted on the blog back in 2014 (here). I found it in Pirkka- magazine. However, it's only in Finnish, so here's the translation. Sweetness of the condensed milk and tangy lemon make a perfect pairing for springtime!
120g soft butter
1,5dl brown sugar
2,5dl rolled oats
2dl all-purpose flour
0,5 teaspoon baking powder
0,5 teaspoon salt
Preheat oven to 175*C. Beat the soft butter and brown sugar until pale and fluffy. Add the dry ingredients and whisk until the texture is crumbly, like clumps of wet sand. Pour 2/3 of the crumb to a lined 20 x 20cm square brownie pan or 20-22cm round cake tin. Press the dough with a spoon or by hand to make an even, dense base.
397g condensed milk
0,75dl lemon juice
1-2 teaspoons grated lemon zest
Mix the condensed milk, lemon juice and zest in a small bowl. The lemon juice will make the milk even thicker. Pour the mixture on top of the base and add the rest of the oat crumb on top. Bake in the middle of the oven for 20-25 minutes until the filling is set and the crumb has a golden colour. Let cool down and place in the fridge for at least an hour. Cut into squares and let stand in room temperature for a while before serving.
120g soft butter
1,5dl brown sugar
2,5dl rolled oats
2dl all-purpose flour
0,5 teaspoon baking powder
0,5 teaspoon salt
Preheat oven to 175*C. Beat the soft butter and brown sugar until pale and fluffy. Add the dry ingredients and whisk until the texture is crumbly, like clumps of wet sand. Pour 2/3 of the crumb to a lined 20 x 20cm square brownie pan or 20-22cm round cake tin. Press the dough with a spoon or by hand to make an even, dense base.
397g condensed milk
0,75dl lemon juice
1-2 teaspoons grated lemon zest
Mix the condensed milk, lemon juice and zest in a small bowl. The lemon juice will make the milk even thicker. Pour the mixture on top of the base and add the rest of the oat crumb on top. Bake in the middle of the oven for 20-25 minutes until the filling is set and the crumb has a golden colour. Let cool down and place in the fridge for at least an hour. Cut into squares and let stand in room temperature for a while before serving.
19. tammikuuta 2017
Kuorrutettu suklaakakku (vegaanit ohoi!)
Facebookin Sipsikaljavegaanit-ryhmästä saa mainioita ideoita, oletteko tutustuneet? Suosittelen! Koska tammikuu on perinteisesti uuden, terveellisemmän elämän aikaa, mutta enhän minä nyt ihmeisiin pysty, kokeilin melkein terveellistä suklaakakkua. Se onnistui paremmin kuin odotinkaan! Lisäksi kakku on vegaaninen, jos käyttää esim. Oatlyn fraichea, eli todellinen hyvän mielen herkku! Ilman kuorrutusta kakku menee vaikka herkkuaamupalasta, mutta raakasuklaakuorrutus kruunaa kokonaisuuden.
2,4dl täysjyvävehnäjauhoja
6rkl leivontakaakaota (voi käyttää myös raakakaakaota)
0,5tl soodaa
0,5tl suolaa
0,5tl pikaespressoa
50g kookossokeria
90g ruokokidesokeria
60g soseutettua avokadoa (n. 1 pieni avokado)
60g fraichea (Oatly) tai crème fraîchea
180g vettä
2tl vaniljauutetta
Sekoita kaikki kuivat aineet keskenään hyvin, käsivispilä sopii tähän tarkoitukseen mainiosti. Soseuta toisessa astiassa avokado käsin tai koneella, lisää joukkoon (crème) fraîche, vesi sekä vanilja ja sekoita. Tee kuivien aineiden keskelle pieni kolo ja kaada avokadoseos siihen. Sekoita vispilällä varovasti taikinaksi, mutta älä vatkaa. Kuivien ja märkien aineiden tarvitsee olla vain juuri sekaisin. Kaada taikina leivinpaperilla vuorattuun leipävuokaan (9x25cm) tai 20cm irtopohjavuokaan ja paista 175-asteisen uunin keskitasossa noin 30-35min. Paistoaika riippuu vuoan koosta (eli kakun korkeudesta). Tarkista kypsyys jo 25 minuutin kohdalla. Kakku saa jäädä kosteaksi, mutta ei raa'aksi. Anna jäähtyä huoneenlämpöiseksi ja siirrä jääkaappiin vähintään tunniksi.
2rkl kookosöljyä sulatettuna
0,5dl raakakaakaota
1-2rkl agave-siirappia
suolaa maun mukaan
pistaasipähkinöitä rouhittuna
Sulata kookosöljy vesihauteessa, sekoita joukkoon raakakaakao ja agavesiirappi. Mausta maun mukaan suolalla, ja jäähdytä hetki jääkaapissa. Valuta kuorrutus kylmän kakun päälle ja koristele pistaasirouheella.
In English:
Glazed Chocolate Cake (vegans ahoy!)
Facebook has this Finnish group called Sipsikaljavegaanit (literal translation chips-and-beer-vegans. It sounds better in Finnish, trust me.) Anyway, people post all sorts of vegan junk food. One can get quite a lot of good ideas from there!
Since January is always the beginning of new and improved life but since I really can't kid anyone, I made this chocolate cake. Partly inspired by the Facebook group, yes. Partly by the need to be a better person while eating chocolate. It's almost healthy, at least on the healthy-ish side. The cake turned out even better than I thought AND it's vegan, so go me! If you don't glaze the cake, it's pretty much breakfast-worthy, but the raw cocoa goodness makes it soooo much better!
1 cup whole wheat flour
6 tablespoons (raw) cocoa powder
0,5 teaspoon baking soda
0,5 teaspoon fine salt
0,5 teaspoon instant espresso
50g coconut sugar
90g cane sugar
60g mashed avocado (1 small)
60g (vegan) crème fraîche
180g water
2 teaspoons vanilla extract
Preheat oven to 175*C. In one bowl, mix all the dry ingredients well together. Small hand held whisk serves the purpose nicely. In another bowl, mash the avocado (e.g.with fork), add the (vegan) crème fraîche, water and vanilla and mix together. Make a small hole in the dry ingredients and pour the avocado mixture into it. Carefully mix the dry and wet ingredients until just together, don't whisk. Pour the batter into a lined loaf tin (about 9x25cm) or 20cm round cake tin. Bake in the middle of the oven for 30-35 minutes. Baking time depends on the size of the tin (the height of the cake), so check after 25 minutes. Cake should stay moist but not raw. Let cool to room temperature and place in the fridge for at least an hour.
2 tablespoons coconut oil, melted
0,5dl raw cocoa powder
1-2 tablespoons agave syrup
fine salt to taste
pistachios
Mix the melted coconut oil, cocoa powder and agave syrup. Add a pinch of salt to taste, and place the glaze in the fridge so it thickens just a bit. Pour the glaze on top of the cold cake and garnish with pistachios.
2,4dl täysjyvävehnäjauhoja
6rkl leivontakaakaota (voi käyttää myös raakakaakaota)
0,5tl soodaa
0,5tl suolaa
0,5tl pikaespressoa
50g kookossokeria
90g ruokokidesokeria
60g soseutettua avokadoa (n. 1 pieni avokado)
60g fraichea (Oatly) tai crème fraîchea
180g vettä
2tl vaniljauutetta
Sekoita kaikki kuivat aineet keskenään hyvin, käsivispilä sopii tähän tarkoitukseen mainiosti. Soseuta toisessa astiassa avokado käsin tai koneella, lisää joukkoon (crème) fraîche, vesi sekä vanilja ja sekoita. Tee kuivien aineiden keskelle pieni kolo ja kaada avokadoseos siihen. Sekoita vispilällä varovasti taikinaksi, mutta älä vatkaa. Kuivien ja märkien aineiden tarvitsee olla vain juuri sekaisin. Kaada taikina leivinpaperilla vuorattuun leipävuokaan (9x25cm) tai 20cm irtopohjavuokaan ja paista 175-asteisen uunin keskitasossa noin 30-35min. Paistoaika riippuu vuoan koosta (eli kakun korkeudesta). Tarkista kypsyys jo 25 minuutin kohdalla. Kakku saa jäädä kosteaksi, mutta ei raa'aksi. Anna jäähtyä huoneenlämpöiseksi ja siirrä jääkaappiin vähintään tunniksi.
2rkl kookosöljyä sulatettuna
0,5dl raakakaakaota
1-2rkl agave-siirappia
suolaa maun mukaan
pistaasipähkinöitä rouhittuna
Sulata kookosöljy vesihauteessa, sekoita joukkoon raakakaakao ja agavesiirappi. Mausta maun mukaan suolalla, ja jäähdytä hetki jääkaapissa. Valuta kuorrutus kylmän kakun päälle ja koristele pistaasirouheella.
In English:
Glazed Chocolate Cake (vegans ahoy!)
Facebook has this Finnish group called Sipsikaljavegaanit (literal translation chips-and-beer-vegans. It sounds better in Finnish, trust me.) Anyway, people post all sorts of vegan junk food. One can get quite a lot of good ideas from there!
Since January is always the beginning of new and improved life but since I really can't kid anyone, I made this chocolate cake. Partly inspired by the Facebook group, yes. Partly by the need to be a better person while eating chocolate. It's almost healthy, at least on the healthy-ish side. The cake turned out even better than I thought AND it's vegan, so go me! If you don't glaze the cake, it's pretty much breakfast-worthy, but the raw cocoa goodness makes it soooo much better!
1 cup whole wheat flour
6 tablespoons (raw) cocoa powder
0,5 teaspoon baking soda
0,5 teaspoon fine salt
0,5 teaspoon instant espresso
50g coconut sugar
90g cane sugar
60g mashed avocado (1 small)
60g (vegan) crème fraîche
180g water
2 teaspoons vanilla extract
Preheat oven to 175*C. In one bowl, mix all the dry ingredients well together. Small hand held whisk serves the purpose nicely. In another bowl, mash the avocado (e.g.with fork), add the (vegan) crème fraîche, water and vanilla and mix together. Make a small hole in the dry ingredients and pour the avocado mixture into it. Carefully mix the dry and wet ingredients until just together, don't whisk. Pour the batter into a lined loaf tin (about 9x25cm) or 20cm round cake tin. Bake in the middle of the oven for 30-35 minutes. Baking time depends on the size of the tin (the height of the cake), so check after 25 minutes. Cake should stay moist but not raw. Let cool to room temperature and place in the fridge for at least an hour.
2 tablespoons coconut oil, melted
0,5dl raw cocoa powder
1-2 tablespoons agave syrup
fine salt to taste
pistachios
Mix the melted coconut oil, cocoa powder and agave syrup. Add a pinch of salt to taste, and place the glaze in the fridge so it thickens just a bit. Pour the glaze on top of the cold cake and garnish with pistachios.
Tunnisteet:
baking,
chocolate,
leivonta,
raakasuklaa,
raw chocolate,
Suklaa,
vegaani,
vegan
23. heinäkuuta 2016
Mustikkapiirakka
Mustikka-aika alkaa olla parhaimmillaan ja mustikkapiirakka kuuluu ehdottomasti to do-listan kärkeen etenkin tähän aikaan vuodesta. Meillä on tehty piirakkaa kyllä ympäri vuoden perinteisellä Mamman marjapiiras-reseptillä, mutta perinteitäkin voi välillä vähän rikkoa ja kokeilla jotain uutta. Tämän piirakan juju on rukiinen pohja ja uunissa ihanaksi paahtuva valkosuklaamuru. Lämpimänä sellaisenaan tai vaniljajäätelön kanssa, ai että!
150g voita
1dl sokeria
1 M-koon kananmuna
1dl ruisjauhoja
2dl vehnäjauhoja
1tl leivinjauhetta
Sulata voi paksupohjaisessa kattilassa ja lisää sokeri. Sekoittele ja anna jäähtyä hetken ennen kananmunan lisäämistä. Vispaa kananmuna joukkoon ja sekoita tasaiseksi. Sekoita keskenään ruisjauhot, vehnäjauhot ja leivinjauhe ja lisää kaikki kuivat aineet voiseokseen, kääntele sekaisin. Levitä taikina piirakkavuokaan tasaisesti.
n. 5dl mustikoita
100g valkosuklaata
200g kermaviiliä
0,5dl sokeria
1tl vaniljasokeria
1 M-koon kananmuna
Levitä mustikat piirakkataikinan pinnalle. Jos käytät pakastemustikoita, sulata niitä hetki ja/tai lisää marjojen sekaan hieman perunajauhoa tai maissitärkkelystä. Näin pohjasta ei tule vetinen. Rouhi valkosuklaa reilun kokoisiksi paloiksi ja ripottele palat mustikoiden päälle. Vispaa kermaviili, sokeri, vaniljasokeri ja kananmuna keskenään tasaiseksi seokseksi. Valuta seos mustikoiden ja valkosuklaan päälle, jätä osa valkosuklaasta kuitenkin näkyviin. Paista piirakkaa 175-asteisen uunin alatasossa noin 45 minuuttia, uunista riippuen. Piirakan keskusta saa olla vielä hieman "hyllyvää" uunista otettaessa, täyte tiivistyy jäähtyessään.
In English:
Blueberry Pie
Blueberry season is at its best in Finland and what would be better than pie? We've baked blueberry pie all year round at home but it's especially good with freshly picked blueberries. This one has rye flour and caramelized white chocolate to bring a bit of a twist. Add a scoop of vanilla ice cream and voilà!
150g butter
1dl sugar
1 egg (medium)
1dl rye flour
2dl all-purpose flour
1 teaspoon baking powder
Preheat oven to 175*C. Melt the butter in a thick-bottomed saucepan and add the sugar. Let the butter cool down a bit and add the egg. Whisk lightly until smooth. Mix together the rye flour, all-purpose flour and baking powder. Add the dry ingredients into the butter mixture and fold until combined. Spread the dough into a pie dish.
about 5dl blueberries
100g white chocolate
200g sour cream (the Nordic kind)
0,5dl sugar
1 teaspoon vanilla sugar
1 egg (medium)
Add the blueberries on top of the dough. If you use frozen blueberries, let them melt for a while and/or mix a bit of corn starch into them. That way the base won't become too wet. Chop the white chocolate roughly and sprinkle it on top of the blueberries. Mix together the sour cream, sugars and egg and whisk until smooth. Pour the mixture on top of blueberries but leave parts of the white chocolate untouched on top. Bake in the lower part of the oven for about 45 minutes, depending on your oven. The filling should still be a bit wobbly when you take the pie out, it will firm up while cooling down.
150g voita
1dl sokeria
1 M-koon kananmuna
1dl ruisjauhoja
2dl vehnäjauhoja
1tl leivinjauhetta
Sulata voi paksupohjaisessa kattilassa ja lisää sokeri. Sekoittele ja anna jäähtyä hetken ennen kananmunan lisäämistä. Vispaa kananmuna joukkoon ja sekoita tasaiseksi. Sekoita keskenään ruisjauhot, vehnäjauhot ja leivinjauhe ja lisää kaikki kuivat aineet voiseokseen, kääntele sekaisin. Levitä taikina piirakkavuokaan tasaisesti.
n. 5dl mustikoita
100g valkosuklaata
200g kermaviiliä
0,5dl sokeria
1tl vaniljasokeria
1 M-koon kananmuna
Levitä mustikat piirakkataikinan pinnalle. Jos käytät pakastemustikoita, sulata niitä hetki ja/tai lisää marjojen sekaan hieman perunajauhoa tai maissitärkkelystä. Näin pohjasta ei tule vetinen. Rouhi valkosuklaa reilun kokoisiksi paloiksi ja ripottele palat mustikoiden päälle. Vispaa kermaviili, sokeri, vaniljasokeri ja kananmuna keskenään tasaiseksi seokseksi. Valuta seos mustikoiden ja valkosuklaan päälle, jätä osa valkosuklaasta kuitenkin näkyviin. Paista piirakkaa 175-asteisen uunin alatasossa noin 45 minuuttia, uunista riippuen. Piirakan keskusta saa olla vielä hieman "hyllyvää" uunista otettaessa, täyte tiivistyy jäähtyessään.
In English:
Blueberry Pie
Blueberry season is at its best in Finland and what would be better than pie? We've baked blueberry pie all year round at home but it's especially good with freshly picked blueberries. This one has rye flour and caramelized white chocolate to bring a bit of a twist. Add a scoop of vanilla ice cream and voilà!
150g butter
1dl sugar
1 egg (medium)
1dl rye flour
2dl all-purpose flour
1 teaspoon baking powder
Preheat oven to 175*C. Melt the butter in a thick-bottomed saucepan and add the sugar. Let the butter cool down a bit and add the egg. Whisk lightly until smooth. Mix together the rye flour, all-purpose flour and baking powder. Add the dry ingredients into the butter mixture and fold until combined. Spread the dough into a pie dish.
about 5dl blueberries
100g white chocolate
200g sour cream (the Nordic kind)
0,5dl sugar
1 teaspoon vanilla sugar
1 egg (medium)
Add the blueberries on top of the dough. If you use frozen blueberries, let them melt for a while and/or mix a bit of corn starch into them. That way the base won't become too wet. Chop the white chocolate roughly and sprinkle it on top of the blueberries. Mix together the sour cream, sugars and egg and whisk until smooth. Pour the mixture on top of blueberries but leave parts of the white chocolate untouched on top. Bake in the lower part of the oven for about 45 minutes, depending on your oven. The filling should still be a bit wobbly when you take the pie out, it will firm up while cooling down.
27. kesäkuuta 2016
Murupaistos
Marjapiirakoiden paras osa on pinnalla oleva muru, joka paistuu ihanan rapeaksi uunissa. Miksi siis edes tehdä pohjaa, kun voi kuorruttaa marjat tai hedelmät murutaikinalla ja herkutella paistoksella sellaisenaan tai jäätelön kera? Taikinaa voi käyttää melkeinpä minkä täytteen kanssa vain, mutta erityisen herkullista se on raparperin ta mustikoiden parina. Tästä reseptistä tulee yksi iso paistos tai useampi pieni, riippuen astioiden koosta. Muruseoksen voi myös pakastaa ja käyttää suoraan pakkasesta, sulatusta ei tarvita (mainio vierasvara siis!).
4dl vehnäjauhoja
1,5dl sokeria
1tl leivinjauhetta
1tl vaniljasokeria
125g voita sulatettuna
Sekoita kuivat aineet hyvin keskenään ja lisää sulanut, hieman jäähtynyt voi. Sekoita hyvin, jotta voi leviää koko taikinaan. Ripottele taikina vuokaan hedelmien / marjojen päälle ja paista 175-asteisen uunin keskitasolla 30-40 minuuttia, kunnes pinta on saanut kauniin värin.
Sokeria vaihtelemalla taikinaan saa erilaista makua, esimerkiksi fariinisokeri ja raparperi tai omenat ovat toimiva makupari. Jos täytteestä irtoaa paljon nestettä (esim. pakastemarjat) kannattaa paistoaikaa pidentää hieman ja sekoittaa maissitärkkelystä tai perunajauhoja hieman täytteen sekaan ennen paistoa.
In English:
Basic crumble
My favourite part of berry pies is the crispy crumble on top. So why bother baking the base at all, since you can just cook berries or fruit with that lovely topping and eat it like that or with ice cream? This basic crumble can be used with pretty much anything but it's especially tasty with rhubarb or blueberries. This recipe yields one big pie or several individual ones depending on the size of the dish. You could also keep the dough in the freezer and use it when acute need for crumble strikes (or surprise guests show up at your door), no need to thaw.
4dl all-purpose flour
1,5dl sugar
1 teaspoon baking powder
1 teaspoon vanilla sugar
125g butter, melted and slightly cooled
Preheat oven to 175*C. Mix all the dry ingredients together and add the melted butter. Mix well so that the butter is incorporated evenly and the dough starts to form crumbs. Sprinkle the dough on top of the prepared fruit / berries and bake in the middle of the oven for 30-40minutes until golden on top.
You could add flavour by substituting part of the regular sugar with brown one or demerara. If the filling contains lot of liquid (e.g. frozen berries), mix them with bit of corn starch before baking and bake for a while longer if needed.
4dl vehnäjauhoja
1,5dl sokeria
1tl leivinjauhetta
1tl vaniljasokeria
125g voita sulatettuna
Sekoita kuivat aineet hyvin keskenään ja lisää sulanut, hieman jäähtynyt voi. Sekoita hyvin, jotta voi leviää koko taikinaan. Ripottele taikina vuokaan hedelmien / marjojen päälle ja paista 175-asteisen uunin keskitasolla 30-40 minuuttia, kunnes pinta on saanut kauniin värin.
Sokeria vaihtelemalla taikinaan saa erilaista makua, esimerkiksi fariinisokeri ja raparperi tai omenat ovat toimiva makupari. Jos täytteestä irtoaa paljon nestettä (esim. pakastemarjat) kannattaa paistoaikaa pidentää hieman ja sekoittaa maissitärkkelystä tai perunajauhoja hieman täytteen sekaan ennen paistoa.
In English:
Basic crumble
My favourite part of berry pies is the crispy crumble on top. So why bother baking the base at all, since you can just cook berries or fruit with that lovely topping and eat it like that or with ice cream? This basic crumble can be used with pretty much anything but it's especially tasty with rhubarb or blueberries. This recipe yields one big pie or several individual ones depending on the size of the dish. You could also keep the dough in the freezer and use it when acute need for crumble strikes (or surprise guests show up at your door), no need to thaw.
4dl all-purpose flour
1,5dl sugar
1 teaspoon baking powder
1 teaspoon vanilla sugar
125g butter, melted and slightly cooled
Preheat oven to 175*C. Mix all the dry ingredients together and add the melted butter. Mix well so that the butter is incorporated evenly and the dough starts to form crumbs. Sprinkle the dough on top of the prepared fruit / berries and bake in the middle of the oven for 30-40minutes until golden on top.
You could add flavour by substituting part of the regular sugar with brown one or demerara. If the filling contains lot of liquid (e.g. frozen berries), mix them with bit of corn starch before baking and bake for a while longer if needed.
16. huhtikuuta 2016
Pähkinä-suklaakeksit purkissa
Ruokalahjat ovat parhaita. Kun ne tulevat kauniissa purkeissa, ne ovat vielä parempia. Ja kätevimmän version saa, jos kasaa kaikki vaaditut kuiva-aineet kauniiseen purkkiin, laittaa reseptin mukaan ja lahjan saaja saa siten leipoa herkkuja sitten, kun se parhaiten sopii. Reseptin pohjana käytin netistä löytämääni karpalo-valkosuklaaversiota. Kuiva-aineiden määrät ovat amerikkalaisia cup-mittoja, joten dl-määrät ovat siksi vähän erikoisia.
1 litran lasipurkki
0,8dl sokeria
0,8dl intiaanisokeria
1,8dl vehnäjauhoja
0,5tl leivinjauhetta
0,5mm soodaa
0,5mm suolaa
2,4dl kaurahiutaleita
1,2dl hasselpähkinärouhetta
1,2dl pekaanipähkinöitä
1,2dl maitosuklaanappeja
1,2dl valkosuklaanappeja
Kuivat aineet kootaan purkkiin kerroksittain, ensin vaalea sokeri, sitten tumma, sitten keskenään sekoitetut vehnäjauhot, leivinjauhe, sooda ja suola. Jauhojen päälle kaurahiutaleet, sitten pähkinät ja lopuksi suklaat. Pähkinät ja suklaat voi sekoittaa keskenään tai lisätä ne kerroksittain, kumpi nyt silmää enemmän miellyttää. Jokaisen kerroksen pinta kannattaa tasoittaa mahdollisimman hyvin, jotta kerroksista tulee siistit ja selvästi erottuvat. Liimaa purkin kylkeen kaunis reseptitarra tai sido kortti esim. juuttinarulla purkin suun ympäri:
120g pehmeää voita
1 litran lasipurkki
0,8dl sokeria
0,8dl intiaanisokeria
1,8dl vehnäjauhoja
0,5tl leivinjauhetta
0,5mm soodaa
0,5mm suolaa
2,4dl kaurahiutaleita
1,2dl hasselpähkinärouhetta
1,2dl pekaanipähkinöitä
1,2dl maitosuklaanappeja
1,2dl valkosuklaanappeja
Kuivat aineet kootaan purkkiin kerroksittain, ensin vaalea sokeri, sitten tumma, sitten keskenään sekoitetut vehnäjauhot, leivinjauhe, sooda ja suola. Jauhojen päälle kaurahiutaleet, sitten pähkinät ja lopuksi suklaat. Pähkinät ja suklaat voi sekoittaa keskenään tai lisätä ne kerroksittain, kumpi nyt silmää enemmän miellyttää. Jokaisen kerroksen pinta kannattaa tasoittaa mahdollisimman hyvin, jotta kerroksista tulee siistit ja selvästi erottuvat. Liimaa purkin kylkeen kaunis reseptitarra tai sido kortti esim. juuttinarulla purkin suun ympäri:
120g pehmeää voita
1 L-koon kananmuna
(1tl vaniljauutetta)
Vatkaa pehmeä voi, kananmuna (ja vaniljauute) hyvin sekaisin. Lisää purkin sisältö ja sekoita taikinaksi. Anna jähmettyä jääkaapissa ainakin n. 30min, pyörittele taikina 18-20 palloksi ja litistä hieman. Paista 190-asteisen uunin keskitasolla 8-10min keksien koosta riippuen.
(1tl vaniljauutetta)
Vatkaa pehmeä voi, kananmuna (ja vaniljauute) hyvin sekaisin. Lisää purkin sisältö ja sekoita taikinaksi. Anna jähmettyä jääkaapissa ainakin n. 30min, pyörittele taikina 18-20 palloksi ja litistä hieman. Paista 190-asteisen uunin keskitasolla 8-10min keksien koosta riippuen.
In English:
Cookies in a jar
Edible gifts are the best. When they come in pretty jars, they're even better. And the most handy version is the one where all the dry ingredients are piled neatly and nicely in a pretty jar just waiting for the best moment to be baked into super yummy cookie goodness (oh that would be such a great ice cream name for Ben & Jerry's, don't you think?!)
1 pretty glass jar (1 liter capacity)
1/3 cup caster sugar
1/3 cup brown sugar
3/4 flour
0,5 teaspoon baking powder
0,5ml baking soda
0,5ml salt
1 cup quick cooking oats
0,5 cup ground/chopped hazelnut
0,5 cup pecans
0,5 cup milk chocolate chips
0,5 cup white chocolate chips
All the dry ingredients are placed in the jar to form neat layers. Start with the white sugar, then add the brown one. Mix together the flour, baking powder, baking soda and salt and add the mixture on top of the brown sugar. Then add the oats, nuts and chocolate. You could mix the nuts together as well as the chocolate chips if you like the look more that way. Place a recipe sticker on the side of the jar or tie a pretty ribbon around it with a recipe card:
120g soft butter
1 large egg
(1 teaspoon vanilla)
Beat the soft butter, egg (and vanilla) together until well combined. Add the cookie mix and fold well until a firm dough is formed. You could do this by had, as well. Cover and refrigerate for at least 30 minutes. Roll the dough into 18-20 balls and place on lined baking sheet. Press a little to form a disk. Bake in the middle of 190*C oven for 8-10 minutes depending on the size of the cookies.
Tunnisteet:
baking,
cookie,
edible gifts,
keksi,
leivonta,
ruokalahja
5. maaliskuuta 2016
Baileys-brownie
Mielestäni after work- tai muunkin drinkin voi varsin hyvin nauttia kakun muodossa. Tämän browniereseptin löysin My Baking Addiction -sivulta, sieltä löytyy muuten aika paljon kaikenlaista ihanaa! Resepti on amerikkalaisissa cup-mitoissa, alla käännös, määrät ovat siksi hassuja. Käytin itse Baileys Chocolat Luxe -kermalikööriä, joten lopputulos oli erityisen suklainen, tavallinenkin Baileys tai sen kaltainen kermalikööri käyvät varsin hyvin.
1,8dl vehnäjauhoja
1,6dl leivontakaakaota
0,5tl suolaa
0,5tl leivinjauhetta
0,6dl voita
2,4dl tummaa suklaata nappeina tai rouhittuna
2,4dl sokeria (tavallinen tai vaalea muscovado)
1,2dl kermalikööriä huoneenlämpöisenä
1tl vaniljauutetta
1 L-koon kananmuna
Sekoita keskenään jauhot, kaakao, suola ja leivinjauhe. Vaikka käyttäisit tavallista, suolattua voita, suosittelen silti käyttämään ainakin vähän suolaa lisäksi. Tämä brownie on niin makea ja suklainen, varsinkin jos käyttää suklaalla maustettua likööriä, että suola tasapainottaa kivasti.
Sulata voi ja suklaa varovasti kattilassa tai mikrossa. Lisää seokseen sokeri, likööri ja vanilja ja sekoita kunnes rakenne on tasainen. Riko kananmunan rakenne ensin esim haarukalla pienessä lasissa ja lisää sitten suklaa-voiseokseen. Sekoita juuri ja juuri tasaiseksi. Kääntele jauhoseos joukkoon, varo vatkaamasta liikaa. Taikinasta tulee paksua, mutta liika sekoitus aikaansaa sitkoa, jota ei tähän herkkuun haluta. Muscovadosokeri antaa rakenteelle lisää tahmaisuutta ja kinuskin makua.
Painele taikina leivinpaperilla vuorattuun 20x20 neliövuokaan tai noin 20-22cm pyöreään irtopohjavuokaan ja paista 175-asteisen uunin keskitasolla 15-17 minuuttia. Brownien pinnan tulisi olla kuiva, mutta kakku saa jäädä keskeltä kosteaksi. Huomioi, että kakku jatkaa hetken kypsymistä myös uunista ottamisen jälkeen, ja harva asia on leivonnassa niin masentavaa kuin ylikypsä brownie. Tämä on hyvää jo tällaisenaan, varsinkin vaniljajäätelön kanssa, mutta jos haluat lisää suklaata ja likööriä, levitä jäähtyneen brownien päälle kuorrutus:
2,4dl tummaa suklaata nappeina tai rouhittuna
0,6dl kermalikööriä huoneenlämpöisenä
0,6dl paksua kuohukermaa
Mittaa suklaa ja kermalikööri kuumuutta kestävään kulhoon. Lämmitä kerma varovasti hyöryäväksi, älä anna kiehua. Kaada kerma suklaan ja liköörin päälle, anna seistä hetken ja sekoita, kunnes seos on tasaista ja kiiltävää. Jos et halua niin terävää alkoholin makua, voit lämmittää myös likööriä kerman kanssa. Anna jäähtyä kunnes ganache hieman paksuuntuu ja levitä brownien päälle. Koristele valkosuklaalla ja iske kiinni!
In English:
Irish Cream Brownies
I found this recipe from a wonderful page called My Baking Addiction. Check it out if you haven't already, there are sooooo many good things! Only thing I changed was the Irish cream and sugar. Instead of the "original" Baileys I used the Baileys Chocolat Luxe which has Belgian chocolate in it (more chocolate can never be a bad thing). I also substituted the regular caster sugar with light muscovado to get that caramel flavour and extra chewiness into the brownie
3/4 cup all-purpose flour
2/3 cup dark cocoa powder
1/2 teaspoon salt
1/2 teaspoon baking powder
1/4 cup (un)salted butter
1 cup semi-sweet chocolate chips
1 cup granulated sugar or light muscovado
1/2 cup Irish cream, at room temperature
1 teaspoon vanilla extract
1 large egg
Preheat oven to 175*C and line a 20x20cm square pan or 20-22cm round pan with parchment paper. Mix together the flour, cocoa powder, salt and baking powder. Even if you use salted butter I recommend to use at least a pinch of salt, especially if use the chocolate version of Baileys, since salt will give a nice balance to all the sweetness and chocolate.
Melt the butter and chocolate carefully in a small saucepan or in a microwave. Add the sugar, Irish cream and vanilla and mix until well combined. Whisk the egg in a small glass with a fork before adding it into the batter, it will help with mixing, since you don't want to over mix. Fold the flour mixture into the batter, again be careful not to over mix. The batter will be quite thick. Scoop the batter into the prepared cake pan and even the surface with a spatula. Bake for 15-17 minutes in the middle of the oven. The top should be dry but the center should stay moist. Brownie will keep on cooking in the pan even after the oven, so rather take it out a bit too early than too late. Not many things in baking are as depressing as an overcooked brownie.
This brownie is good as it is, especially with vanilla ice cream, but if you crave even more chocolate (and booze) this ganache will seal the deal:
1 cup semi-sweet chocolate chips
1/4 cup Irish cream, at room temperature
1/4 cup thick whipping cream
Place the chocolate chips and Irish cream in a small bowl. Heat the cream carefully until steamy, don't let it boil. Pour the hot cream on top of chocolate and Irish cream, let sit for a minute or so and fold gently until smooth and shiny. If you don't want the taste of alcohol, you can heat the Irish cream along with the whipping cream, just be careful not to boil it. Let the ganache sit for 15 minutes or until it thickens and spread it on top of the brownie. Sprinkle white chocolate chips on top and voilà!
1,8dl vehnäjauhoja
1,6dl leivontakaakaota
0,5tl suolaa
0,5tl leivinjauhetta
0,6dl voita
2,4dl tummaa suklaata nappeina tai rouhittuna
2,4dl sokeria (tavallinen tai vaalea muscovado)
1,2dl kermalikööriä huoneenlämpöisenä
1tl vaniljauutetta
1 L-koon kananmuna
Sekoita keskenään jauhot, kaakao, suola ja leivinjauhe. Vaikka käyttäisit tavallista, suolattua voita, suosittelen silti käyttämään ainakin vähän suolaa lisäksi. Tämä brownie on niin makea ja suklainen, varsinkin jos käyttää suklaalla maustettua likööriä, että suola tasapainottaa kivasti.
Sulata voi ja suklaa varovasti kattilassa tai mikrossa. Lisää seokseen sokeri, likööri ja vanilja ja sekoita kunnes rakenne on tasainen. Riko kananmunan rakenne ensin esim haarukalla pienessä lasissa ja lisää sitten suklaa-voiseokseen. Sekoita juuri ja juuri tasaiseksi. Kääntele jauhoseos joukkoon, varo vatkaamasta liikaa. Taikinasta tulee paksua, mutta liika sekoitus aikaansaa sitkoa, jota ei tähän herkkuun haluta. Muscovadosokeri antaa rakenteelle lisää tahmaisuutta ja kinuskin makua.
Painele taikina leivinpaperilla vuorattuun 20x20 neliövuokaan tai noin 20-22cm pyöreään irtopohjavuokaan ja paista 175-asteisen uunin keskitasolla 15-17 minuuttia. Brownien pinnan tulisi olla kuiva, mutta kakku saa jäädä keskeltä kosteaksi. Huomioi, että kakku jatkaa hetken kypsymistä myös uunista ottamisen jälkeen, ja harva asia on leivonnassa niin masentavaa kuin ylikypsä brownie. Tämä on hyvää jo tällaisenaan, varsinkin vaniljajäätelön kanssa, mutta jos haluat lisää suklaata ja likööriä, levitä jäähtyneen brownien päälle kuorrutus:
2,4dl tummaa suklaata nappeina tai rouhittuna
0,6dl kermalikööriä huoneenlämpöisenä
0,6dl paksua kuohukermaa
Mittaa suklaa ja kermalikööri kuumuutta kestävään kulhoon. Lämmitä kerma varovasti hyöryäväksi, älä anna kiehua. Kaada kerma suklaan ja liköörin päälle, anna seistä hetken ja sekoita, kunnes seos on tasaista ja kiiltävää. Jos et halua niin terävää alkoholin makua, voit lämmittää myös likööriä kerman kanssa. Anna jäähtyä kunnes ganache hieman paksuuntuu ja levitä brownien päälle. Koristele valkosuklaalla ja iske kiinni!
In English:
Irish Cream Brownies
I found this recipe from a wonderful page called My Baking Addiction. Check it out if you haven't already, there are sooooo many good things! Only thing I changed was the Irish cream and sugar. Instead of the "original" Baileys I used the Baileys Chocolat Luxe which has Belgian chocolate in it (more chocolate can never be a bad thing). I also substituted the regular caster sugar with light muscovado to get that caramel flavour and extra chewiness into the brownie
3/4 cup all-purpose flour
2/3 cup dark cocoa powder
1/2 teaspoon salt
1/2 teaspoon baking powder
1/4 cup (un)salted butter
1 cup semi-sweet chocolate chips
1 cup granulated sugar or light muscovado
1/2 cup Irish cream, at room temperature
1 teaspoon vanilla extract
1 large egg
Preheat oven to 175*C and line a 20x20cm square pan or 20-22cm round pan with parchment paper. Mix together the flour, cocoa powder, salt and baking powder. Even if you use salted butter I recommend to use at least a pinch of salt, especially if use the chocolate version of Baileys, since salt will give a nice balance to all the sweetness and chocolate.
Melt the butter and chocolate carefully in a small saucepan or in a microwave. Add the sugar, Irish cream and vanilla and mix until well combined. Whisk the egg in a small glass with a fork before adding it into the batter, it will help with mixing, since you don't want to over mix. Fold the flour mixture into the batter, again be careful not to over mix. The batter will be quite thick. Scoop the batter into the prepared cake pan and even the surface with a spatula. Bake for 15-17 minutes in the middle of the oven. The top should be dry but the center should stay moist. Brownie will keep on cooking in the pan even after the oven, so rather take it out a bit too early than too late. Not many things in baking are as depressing as an overcooked brownie.
This brownie is good as it is, especially with vanilla ice cream, but if you crave even more chocolate (and booze) this ganache will seal the deal:
1 cup semi-sweet chocolate chips
1/4 cup Irish cream, at room temperature
1/4 cup thick whipping cream
Place the chocolate chips and Irish cream in a small bowl. Heat the cream carefully until steamy, don't let it boil. Pour the hot cream on top of chocolate and Irish cream, let sit for a minute or so and fold gently until smooth and shiny. If you don't want the taste of alcohol, you can heat the Irish cream along with the whipping cream, just be careful not to boil it. Let the ganache sit for 15 minutes or until it thickens and spread it on top of the brownie. Sprinkle white chocolate chips on top and voilà!
3. lokakuuta 2015
Punaherukkaskonssit
Pakastimeni on jokseenkin täynnä marjoja, lähinnä punaherukkaa ja mansikkaa. Herukoista tehtiin mehua ja loput pakastin kokonaisina, mutta kun mietin, mitä niistä leipoisin, ei mieleen tullut kovinkaan montaa ennestään tuttua reseptiä. Skonssit olivat leivontalistallani jo muutenkin, joten punaherukat päätyivät ensimmäisenä niihin.
Tämä on pieni resepti, määrästä tulee neljä reilun kokoista skonssia tai kuusi pienempää. Marjat kannattaa käyttää aivan jäisenä, jotta ne saa sekoitettua taikinaan mahdollisimman siististi. Skonssit ovat parhaimmillaan aivan tuoreina, joten jos aamiais-/ brunssivieraita ei ole, määrä on varsin sopiva, mutta taikinan voi myös tuplata. Tämän reseptin pohjana on jenkkiohje, ja mitat ovat kupeissa. Vieressä ml- mitta, joka on karkea pyöristys.
1 cup / 240ml vehnäjauhoja
1/4 cup / 60ml ruokokidesokeria
1tl leivinjauhetta
1,5mm soodaa (mm = maustemitta)
1,5mm kanelia
55g kylmää voita
1/4 cup / 60ml (täys)maitoa
1/4cup / 60ml ruokakermaa
3/4 cup / 180ml punaherukoita, jäisenä
voisulaa skonssien voiteluun
demerara- tai raesokeria
Jauhot, kidesokeri, leivinjauhe, sooda ja kaneli sekoitetaan keskenään. Kylmä voi kuutioidaan ja nypitään kuiviin aineisiin. Maito ja ruokakerma sekoitetaan keskenään ja lisätään neste jauho-voiseokseen. Kun taikina on lähes sekoittunut, lisätään jäiset punaherukat. Mitä vähemmän taikinaa työstää, sen parempi ja murenevampi lopputulos on. Heti kun taikina pysyy kasassa, se kannattaa kumota leivinpaperille ja painella kevyesti pyöreäksi levyksi. Apuna voi käyttää hieman jauhoja, jos taikina tarttuu. Skonssit voi leikata veitsellä tai vaikka pizzaleikkurilla kolmioiksi tai ottaa taikinasta muotilla paloja. Skonssit voidellaan voisulalla ennen paistoa ja päälle voi ripotella demerara- tai raesokeria. Paistetaan 200- asteisen uunin keskitasolla, koosta riippuen, noin 16-20 minuuttia. Parhaimmillaan nämä ovat aivan tuoreena ja vähän lämpiminä. Tarvittaessa pientä tekohengitystä voi antaa leivänpaahtimessa, jolloin pinnasta tulee uudelleen rapea.
In English:
My freezer is full of berries, mainly redcurrants and strawberries. I cooked most of the redcurrants into cordial, but the rest is frozen whole. I didn't have that many recipes tested that use redcurrants, but scones were on my to do- list anyway, so in they went.
This is a small recipe, it yields for big scones or six smaller ones. I recommend you use the berries frozen so that it's easy to mix them into the dough and they won't bleed and make the dough red all over. Scones are best fresh from the oven so if you don't have any breakfast or brunch guests, this amount is perfect. However, you could double the amounts.
1 cup flour
1/4 cup fine cane sugar
1 teaspoon baking powder
1/8 teaspoon baking soda
1/8 teaspoon cinnamon
55g cold butter
1/4 cup (full-fat) milk
1/4 cup cream
3/4 cup redcurrants, frozen
melted butter for brushing
demerara / other coarse sugar for sprinkling
Preheat oven to 200*C. Mix the flour, fine cane sugar, baking powder, soda and cinnamon in a bowl. Cut the cold butter into small cubes and pinch / rub it with the dry ingredients until the texture resembles wet sand. Mix together the milk and cream and add to the flour-butter-mixture. Once the dough almost holds together, fold in the frozen redcurrants and mix as little as possible. Dump the dough out onto a baking sheet lined with parchment and press lightly to form a round disk. Sprinkle a bit of flour on the dough and parchment, if the dough feels sticky. Cut the disk in quarters or six pieces using knife or a pizza cutter. Brush with melted butter and sprinkle demerara or other coarse sugar on top. Bake in the middle of the oven, depending on the size, for 16-20 minutes. Scones are best fresh and warm, but if you eat these a bit later, give a little mouth-to-mouth in a toaster. That'll make them fresh again.
Tämä on pieni resepti, määrästä tulee neljä reilun kokoista skonssia tai kuusi pienempää. Marjat kannattaa käyttää aivan jäisenä, jotta ne saa sekoitettua taikinaan mahdollisimman siististi. Skonssit ovat parhaimmillaan aivan tuoreina, joten jos aamiais-/ brunssivieraita ei ole, määrä on varsin sopiva, mutta taikinan voi myös tuplata. Tämän reseptin pohjana on jenkkiohje, ja mitat ovat kupeissa. Vieressä ml- mitta, joka on karkea pyöristys.
1 cup / 240ml vehnäjauhoja
1/4 cup / 60ml ruokokidesokeria
1tl leivinjauhetta
1,5mm soodaa (mm = maustemitta)
1,5mm kanelia
55g kylmää voita
1/4 cup / 60ml (täys)maitoa
1/4cup / 60ml ruokakermaa
3/4 cup / 180ml punaherukoita, jäisenä
voisulaa skonssien voiteluun
demerara- tai raesokeria
Jauhot, kidesokeri, leivinjauhe, sooda ja kaneli sekoitetaan keskenään. Kylmä voi kuutioidaan ja nypitään kuiviin aineisiin. Maito ja ruokakerma sekoitetaan keskenään ja lisätään neste jauho-voiseokseen. Kun taikina on lähes sekoittunut, lisätään jäiset punaherukat. Mitä vähemmän taikinaa työstää, sen parempi ja murenevampi lopputulos on. Heti kun taikina pysyy kasassa, se kannattaa kumota leivinpaperille ja painella kevyesti pyöreäksi levyksi. Apuna voi käyttää hieman jauhoja, jos taikina tarttuu. Skonssit voi leikata veitsellä tai vaikka pizzaleikkurilla kolmioiksi tai ottaa taikinasta muotilla paloja. Skonssit voidellaan voisulalla ennen paistoa ja päälle voi ripotella demerara- tai raesokeria. Paistetaan 200- asteisen uunin keskitasolla, koosta riippuen, noin 16-20 minuuttia. Parhaimmillaan nämä ovat aivan tuoreena ja vähän lämpiminä. Tarvittaessa pientä tekohengitystä voi antaa leivänpaahtimessa, jolloin pinnasta tulee uudelleen rapea.
In English:
My freezer is full of berries, mainly redcurrants and strawberries. I cooked most of the redcurrants into cordial, but the rest is frozen whole. I didn't have that many recipes tested that use redcurrants, but scones were on my to do- list anyway, so in they went.
This is a small recipe, it yields for big scones or six smaller ones. I recommend you use the berries frozen so that it's easy to mix them into the dough and they won't bleed and make the dough red all over. Scones are best fresh from the oven so if you don't have any breakfast or brunch guests, this amount is perfect. However, you could double the amounts.
1 cup flour
1/4 cup fine cane sugar
1 teaspoon baking powder
1/8 teaspoon baking soda
1/8 teaspoon cinnamon
55g cold butter
1/4 cup (full-fat) milk
1/4 cup cream
3/4 cup redcurrants, frozen
melted butter for brushing
demerara / other coarse sugar for sprinkling
Preheat oven to 200*C. Mix the flour, fine cane sugar, baking powder, soda and cinnamon in a bowl. Cut the cold butter into small cubes and pinch / rub it with the dry ingredients until the texture resembles wet sand. Mix together the milk and cream and add to the flour-butter-mixture. Once the dough almost holds together, fold in the frozen redcurrants and mix as little as possible. Dump the dough out onto a baking sheet lined with parchment and press lightly to form a round disk. Sprinkle a bit of flour on the dough and parchment, if the dough feels sticky. Cut the disk in quarters or six pieces using knife or a pizza cutter. Brush with melted butter and sprinkle demerara or other coarse sugar on top. Bake in the middle of the oven, depending on the size, for 16-20 minutes. Scones are best fresh and warm, but if you eat these a bit later, give a little mouth-to-mouth in a toaster. That'll make them fresh again.
23. syyskuuta 2015
Nettihitti: Suklaalevypiirakka
Oletteko nähneet Youtube-videon, jossa suklaalevy letitetään voitaikinan sisään ja voilà, piirakka on valmis? Taisin itse nähdä jutun ensimmäisen kerran Food & Winen Facebook-sivulla jo jokin aika sitten, mutta nyt viimein se ylitti uutiskynnyksen myös suomalaisessa mediassa. Pakkohan sitä oli kokeilla, ihan vaan testimielessä (kröhöm), vaikka vähän epäilytti.
Itsekurin kuvitelman varjolla tyydyin tekemään pienemmän testierän 100g suklaalevyllä ja kahdella torttutaikinalevyllä. Kyllähän siitä ihan makoisaa tuli, ulkonäkökin onnistui kerralla jo aika hyvin. Tämä, jos mikä, on aikamoinen hätävararesepti (katso muita täältä, täältä ja täältä). Suklaalevyä vaihtelemalla saa uusia vivahteita ja torttutaikinoiden paras sesonki on taas alkamassa (koska pian on joulu!).
100g suklaalevy
2 torttutaikinalevyä
1 keltuainen
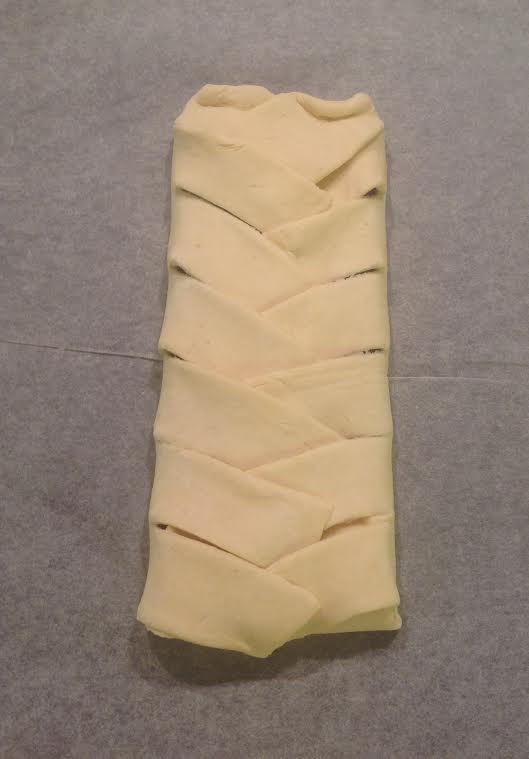
Sulata taikinalevyt ja kauli ne yhteen. Saumakohta kannattaa nipistellä hyvin, jotta se ei ratkea paistuessaan. Taikinan tulisi olla päistä pari senttiä suklaalevyä pidempi ja sivuilta viitisen senttiä leveämpi. Ylijäävästä taikinasta voi taiteilla vaikka pieniä joulutorttuja. Aseta suklaalevy keskelle taikinalevyä ja leikkaa reunoihin viillot noin sentin välein. Itse käytin mittana suklaapalojen saumakohtia. Käännä suikaleet vuorotellen suklaalevyn päälle ristikkäin ja paketoi päät siististi ja tiiviisti taikinasuikaleiden alle. Riko keltuaisen rakenne, voitele taikinan pinta hyvin ja paista 200-225 -asteisen uunin keskitasolla noin 15 minuuttia. Anna jäähtyä ja leikkaa terävällä veitsellä viipaleiksi ja koristele ripauksella tomusokeria. Kas näin:
In English:
Super Easy Chocolate Pie
Have you guys seen the Youtube video (above), where chocolate bar is wrapped in puff pastry and voilà! The simplest chocolate tart is done? I think I noticed this video first on Food & Wine's Facebook page, but it has finally become news here in Finland, too (yeah, we are a bit slow like that..) Naturally, in the name of test baking, I had to make it now, too. However, I sized it down a bit, and made half of the original recipe. You get different result and flavour by changing the chocolate bar and since Christmas is almost just around the corner, puff pastry is in season too. Or well, it might always be in season.
100g chocolate bar
2 sheets puff pastry
1 egg yolk
Preheat oven to 200-225*C. Roll out the puff pastry, make sure to pinch the seam so it won't break in the oven. The dough should be 2-3cm longer and about 5cm wider on each side than the chocolate bar. Place the chocolate in the middle and cut the dough into strips (see video). I measured the strips according to the "seams" of the chocolate bar. Fold the strips of dough, each side in turn, to the middle and wrap the top and bottom neatly. Whisk the yolk lightly and brush the pie carefully with the yolk. Bake in the middle of the oven for about 15 minutes. Let the pie cool completely and cut with a sharp knife before serving. Sprinkle a bit of powdered sugar on top, if you feel like being fancy.
Itsekurin kuvitelman varjolla tyydyin tekemään pienemmän testierän 100g suklaalevyllä ja kahdella torttutaikinalevyllä. Kyllähän siitä ihan makoisaa tuli, ulkonäkökin onnistui kerralla jo aika hyvin. Tämä, jos mikä, on aikamoinen hätävararesepti (katso muita täältä, täältä ja täältä). Suklaalevyä vaihtelemalla saa uusia vivahteita ja torttutaikinoiden paras sesonki on taas alkamassa (koska pian on joulu!).
100g suklaalevy
2 torttutaikinalevyä
1 keltuainen
Sulata taikinalevyt ja kauli ne yhteen. Saumakohta kannattaa nipistellä hyvin, jotta se ei ratkea paistuessaan. Taikinan tulisi olla päistä pari senttiä suklaalevyä pidempi ja sivuilta viitisen senttiä leveämpi. Ylijäävästä taikinasta voi taiteilla vaikka pieniä joulutorttuja. Aseta suklaalevy keskelle taikinalevyä ja leikkaa reunoihin viillot noin sentin välein. Itse käytin mittana suklaapalojen saumakohtia. Käännä suikaleet vuorotellen suklaalevyn päälle ristikkäin ja paketoi päät siististi ja tiiviisti taikinasuikaleiden alle. Riko keltuaisen rakenne, voitele taikinan pinta hyvin ja paista 200-225 -asteisen uunin keskitasolla noin 15 minuuttia. Anna jäähtyä ja leikkaa terävällä veitsellä viipaleiksi ja koristele ripauksella tomusokeria. Kas näin:
In English:
Super Easy Chocolate Pie
Have you guys seen the Youtube video (above), where chocolate bar is wrapped in puff pastry and voilà! The simplest chocolate tart is done? I think I noticed this video first on Food & Wine's Facebook page, but it has finally become news here in Finland, too (yeah, we are a bit slow like that..) Naturally, in the name of test baking, I had to make it now, too. However, I sized it down a bit, and made half of the original recipe. You get different result and flavour by changing the chocolate bar and since Christmas is almost just around the corner, puff pastry is in season too. Or well, it might always be in season.
100g chocolate bar
2 sheets puff pastry
1 egg yolk
Preheat oven to 200-225*C. Roll out the puff pastry, make sure to pinch the seam so it won't break in the oven. The dough should be 2-3cm longer and about 5cm wider on each side than the chocolate bar. Place the chocolate in the middle and cut the dough into strips (see video). I measured the strips according to the "seams" of the chocolate bar. Fold the strips of dough, each side in turn, to the middle and wrap the top and bottom neatly. Whisk the yolk lightly and brush the pie carefully with the yolk. Bake in the middle of the oven for about 15 minutes. Let the pie cool completely and cut with a sharp knife before serving. Sprinkle a bit of powdered sugar on top, if you feel like being fancy.
22. elokuuta 2015
Brownie-banoffee
Tämän banoffeen inspiraatio tuli Valion reseptistä samoin kuin hieman epätavallisen, Koskenlaskijasta tehdyn kinuskin. Muutoin ohje on yhdistelmä muita hyväksi havaittuja komponentteja. Koskenlaskija-kinuski onnistui hyvin ja oli kyllä kätevä valmistaa, mutta jatkossa taidan silti käyttää sitä perinteisempää banoffee-kinuskia eli kondensoitua maitoa. Tätäkin kannattaa kuitenkin kokeilla vähintään kerran, varsinkin jos pidät erityisesti sulatejuustosta.
Tämä on tuota Valio reseptiä pienempi kakku, ja tein pohjan 18-senttiseen irtopohjavuokaan. Ohje on alun perin Dessert for Twon ja yhtä sen muunnelmaa on käytetty myös tässä brownie-ohjeessa.
45g voita paloiteltuna
110g vaaleaa muscovadosokeria
35g leivontakaakaota
0,5tl vaniljauutetta
1 kananmuna
25g (kakku)vehnäjauhoja
Voi, sokeri ja kaakao sulatetaan yhteen mikrossa. Mikrosta riippuen pari puolen minuutin pätkää täydellä teholla ovat riittävät, tosin välissä on hyvä sekoittaa. Jos seos on kovin kuumaa, anna sen jäähtyä hetken, jotta kananmuna ei ala hyytyä. Lisää sitten joukkoon vaniljauute sekä kananmuna ja sekoita hyvin, kunnes taikina on tasaista. Sekoita mukaan jauhot, taikinan tulisi olla sileää. Itse käytän käsivispilää, jauhoja on sen verran vähän ettei sitkoa juurikaan synny. Levitä taikina leivinpaperilla vuorattuun 18-senttiseen irtopohjavuokaan ja tasoita pinta. Paista 160-asteisen uunin keskitasossa noin 18-20 minuuttia. Brownie saa jäädä hieman kosteaksi sisältä.
2dl fariinisokeria
250g (1prk) Valio Koskelaskija Ruoka, maustamaton
(ripaus suolaa)
Sekoita sokeri ja Koskenlaskija ja keitä seosta välillä sekoitellen 6-7 minuuttia, kunnes seos on selvästi sakeaa ja maku kinuskinen. Mausta halutessasi suolalla. Tein itse kinuskin isolla keraamisella paistinpannulla, jolloin lyhyempi keittoaika riitti, kinuski paksuuntuu vielä jäähtyessään. Levitä kinuski brownie-pohjan päälle ja jäähdytä kakku jääkaapissa. (Kinuskia saattaa jäädä jonkin verran yli, se on erityisen hyvää esimerkiksi digestive-keksien päälle levitettynä.) Tähän asti kakun voi tehdä jo edellisenä päivänä. ja lisätä loput vasta juuri ennen tarjoilua.
2 pientä banaania
1,5dl kookoskermaa jääkaappikylmänä
1dl paksua kreikkalaista jogurttia
1tl vaniljasokeria
1tl leivontakaakaota
Nosta kakku jääkaapista huoneenlämpöön noin puoli tuntia ennen tarjoilua, jotta brownie ja kinuski pehmenevät sopivasti. Vatkaa kylmä kookoskerma vaahdoksi ja lisää paksu kreikkalainen jogurtti, vatkaa tasaiseksi. Mausta vaniljasokerilla. Viipaloi banaanit ja asettele viipaleet kinuskin päälle. Lusikoi kookos-jogurttivaahto banaanien päälle ja sihtaa lopuksi kaakaota koristeeksi. Koska banaanit tummuvat nopeasti, kannattaa tämä herkku syödä saman päivän aikana. Jos pieni visuaalinen värivirhe ei haittaa, maistuu kakku hyvin vielä seuraavanakin päivänä. Tahmean suklainen pohja, suolainen kinuski ja raikas vaahto toimivat kivasti makean banaanin kanssa. Vaikka kakku on pieni, siitä riittää useammalle syöjälle tai ainakin useampaan annokseen.
In English:
Brownie banoffee
I got the inspiration for this recipe from Valio as well as the actual recipe for the caramel. It's made of this cream-like butter cheese called "Koskenlaskija". Unfortunately I don't know if there's anything like it abroad but you could substitute it with a thick salted caramel made of condensed milk.
The brownie bottom is a modified version of Dessert for Two's recipe:
45g butter, diced
110g light muscovado
35g cocoa powder, unsweetened
0,5 teaspoon vanilla extract
1 egg
25g all-purpose flour
Preheat the oven to 160*C. Combine the butter, sugar and cocoa in a microwave-safe bowl. Microwave on high for 30 seconds, stir and microwave another 30 seconds. Stir again and let the mixture cool down a bit. Add the vanilla and egg and whisk until the consistency is smooth. Sprinkle in the flour and whisk again for smooth consistency. Pour the batter into a lined 18cm lose-bottomed cake tin and bake in the middle of the oven for 18-20 minutes. Brownie should stay a bit sticky and moist.
2dl brown sugar
250g (1 tub) Koskenlaskija butter cheese
(salt to taste)
or
1 jar (397g) condensed milk
salt to taste
Mix the sugar and butter cheese in a frying pan or thick-bottomed saucepan. Cook for 6-7 minutes, stirring every now and then, until the consistency is thick and flavour caramelized. Season with salt. I cooked the caramel on a ceramic frying pan so the cooking time was shorter. The caramel will get thicker as it cools down. You could also make the caramel out of condensed milk and season it with salt.
Spread the caramel on top of the brownie and place the cake in the fridge for a few hours - overnight. There will probably be some caramel left over, it's nice with digestive biscuits or ice cream.
2 small bananas
1,5dl coconut cream, cold
1dl thick Greek yoghurt
1 teaspoon vanilla sugar
1 teaspoon cocoa powder, unsweetened
Take the cake out of the fridge for about 30 minutes before serving so that the brownie and caramel soften a bit. Slice the bananas and arrange them neatly on top of the caramel. Whisk the cold coconut cream and add the yoghurt, whisk until smooth. Add the vanilla sugar and spread on top of the banana slices. Sprinkle the cocoa on top and serve quickly as the bananas will turn brown. If you won't mind the brownish colour, this cake is very nice the next day, too. Sticky, intense chocolate brownie, salted caramel and fresh, not-too-sweet yoghurt-cream make a nice combo with the bananas. Even though the cake isn't very big it serves quite a few. Or at least you get quite a few servings if there aren't that many eating the cake.
Tämä on tuota Valio reseptiä pienempi kakku, ja tein pohjan 18-senttiseen irtopohjavuokaan. Ohje on alun perin Dessert for Twon ja yhtä sen muunnelmaa on käytetty myös tässä brownie-ohjeessa.
45g voita paloiteltuna
110g vaaleaa muscovadosokeria
35g leivontakaakaota
0,5tl vaniljauutetta
1 kananmuna
25g (kakku)vehnäjauhoja
Voi, sokeri ja kaakao sulatetaan yhteen mikrossa. Mikrosta riippuen pari puolen minuutin pätkää täydellä teholla ovat riittävät, tosin välissä on hyvä sekoittaa. Jos seos on kovin kuumaa, anna sen jäähtyä hetken, jotta kananmuna ei ala hyytyä. Lisää sitten joukkoon vaniljauute sekä kananmuna ja sekoita hyvin, kunnes taikina on tasaista. Sekoita mukaan jauhot, taikinan tulisi olla sileää. Itse käytän käsivispilää, jauhoja on sen verran vähän ettei sitkoa juurikaan synny. Levitä taikina leivinpaperilla vuorattuun 18-senttiseen irtopohjavuokaan ja tasoita pinta. Paista 160-asteisen uunin keskitasossa noin 18-20 minuuttia. Brownie saa jäädä hieman kosteaksi sisältä.
2dl fariinisokeria
250g (1prk) Valio Koskelaskija Ruoka, maustamaton
(ripaus suolaa)
Sekoita sokeri ja Koskenlaskija ja keitä seosta välillä sekoitellen 6-7 minuuttia, kunnes seos on selvästi sakeaa ja maku kinuskinen. Mausta halutessasi suolalla. Tein itse kinuskin isolla keraamisella paistinpannulla, jolloin lyhyempi keittoaika riitti, kinuski paksuuntuu vielä jäähtyessään. Levitä kinuski brownie-pohjan päälle ja jäähdytä kakku jääkaapissa. (Kinuskia saattaa jäädä jonkin verran yli, se on erityisen hyvää esimerkiksi digestive-keksien päälle levitettynä.) Tähän asti kakun voi tehdä jo edellisenä päivänä. ja lisätä loput vasta juuri ennen tarjoilua.
2 pientä banaania
1,5dl kookoskermaa jääkaappikylmänä
1dl paksua kreikkalaista jogurttia
1tl vaniljasokeria
1tl leivontakaakaota
Nosta kakku jääkaapista huoneenlämpöön noin puoli tuntia ennen tarjoilua, jotta brownie ja kinuski pehmenevät sopivasti. Vatkaa kylmä kookoskerma vaahdoksi ja lisää paksu kreikkalainen jogurtti, vatkaa tasaiseksi. Mausta vaniljasokerilla. Viipaloi banaanit ja asettele viipaleet kinuskin päälle. Lusikoi kookos-jogurttivaahto banaanien päälle ja sihtaa lopuksi kaakaota koristeeksi. Koska banaanit tummuvat nopeasti, kannattaa tämä herkku syödä saman päivän aikana. Jos pieni visuaalinen värivirhe ei haittaa, maistuu kakku hyvin vielä seuraavanakin päivänä. Tahmean suklainen pohja, suolainen kinuski ja raikas vaahto toimivat kivasti makean banaanin kanssa. Vaikka kakku on pieni, siitä riittää useammalle syöjälle tai ainakin useampaan annokseen.
In English:
Brownie banoffee
I got the inspiration for this recipe from Valio as well as the actual recipe for the caramel. It's made of this cream-like butter cheese called "Koskenlaskija". Unfortunately I don't know if there's anything like it abroad but you could substitute it with a thick salted caramel made of condensed milk.
The brownie bottom is a modified version of Dessert for Two's recipe:
45g butter, diced
110g light muscovado
35g cocoa powder, unsweetened
0,5 teaspoon vanilla extract
1 egg
25g all-purpose flour
Preheat the oven to 160*C. Combine the butter, sugar and cocoa in a microwave-safe bowl. Microwave on high for 30 seconds, stir and microwave another 30 seconds. Stir again and let the mixture cool down a bit. Add the vanilla and egg and whisk until the consistency is smooth. Sprinkle in the flour and whisk again for smooth consistency. Pour the batter into a lined 18cm lose-bottomed cake tin and bake in the middle of the oven for 18-20 minutes. Brownie should stay a bit sticky and moist.
2dl brown sugar
250g (1 tub) Koskenlaskija butter cheese
(salt to taste)
or
1 jar (397g) condensed milk
salt to taste
Mix the sugar and butter cheese in a frying pan or thick-bottomed saucepan. Cook for 6-7 minutes, stirring every now and then, until the consistency is thick and flavour caramelized. Season with salt. I cooked the caramel on a ceramic frying pan so the cooking time was shorter. The caramel will get thicker as it cools down. You could also make the caramel out of condensed milk and season it with salt.
Spread the caramel on top of the brownie and place the cake in the fridge for a few hours - overnight. There will probably be some caramel left over, it's nice with digestive biscuits or ice cream.
2 small bananas
1,5dl coconut cream, cold
1dl thick Greek yoghurt
1 teaspoon vanilla sugar
1 teaspoon cocoa powder, unsweetened
Take the cake out of the fridge for about 30 minutes before serving so that the brownie and caramel soften a bit. Slice the bananas and arrange them neatly on top of the caramel. Whisk the cold coconut cream and add the yoghurt, whisk until smooth. Add the vanilla sugar and spread on top of the banana slices. Sprinkle the cocoa on top and serve quickly as the bananas will turn brown. If you won't mind the brownish colour, this cake is very nice the next day, too. Sticky, intense chocolate brownie, salted caramel and fresh, not-too-sweet yoghurt-cream make a nice combo with the bananas. Even though the cake isn't very big it serves quite a few. Or at least you get quite a few servings if there aren't that many eating the cake.
![]() |
| 100 seuraajaa Instagramissa, aikamoista! / 100 followers on Instagram, wow! |
1. elokuuta 2015
Mansikkapiiras
Galette on siinä(kin) mielessä ihana piiras, että sen ulkonäkö saa ja pitääkin olla rustiikki, vaikka nimi kuulostaakin kovin hienolta. Et tarvitse vuokaa, muoto saa olla vapaa ja valmis piiras leikataan vapaasti sopivan kokoisiksi paloiksi. Tämä resepti on aika suoraan Dessert for Two:sta Tästä tulee siis pieni piiras. Varmasti maistuisi myös luumun kanssa, mutta minulla oli vain pakastettuja mansikoita sillä hetkellä, kun leivontainto iski. Tämänkin vuoksi resepti on mainio, täytteeseen voi käyttää hedelmiä tai marjoja oman maun ja sesongin mukaan.
1 tablespoon all-purpose flour
110g voita
3dl vehnäjauhoja
1tl sokeria
2-3rkl kylmää vettä
Leikkaa jääkaappikylmä voi pieniksi kuutioiksi ja nypi se jauhojen ja sokerin kanssa murumaiseksi seokseksi. Lisää kylmää vettä ruokalusikallinen kerrallaan. Taikinan tulee pysyä juuri kasassa, vettä tarvitaan siis vain sen verran. Kaada taikina muovikelmupalalle, aseta toinen pala kelmua päälle ja painele taikina levyksi. Laita kelmutettu taikinalevy jääkaappiin lepäämään vähintään 30 minuutiksi, taikinan voi tehdä myös edellisenä päivänä.
1rkl vehnäjauhoja
2rkl manteleita (tai mantelijauhoa)
3rkl ruokokidesokeria
8-10 mansikkaa
1rkl kermaa (voiteluun)
1rkl demerara-sokeria
Sekoita jauhot, mantelit ja ruokokidesokeri monitoimikoneessa, kunnes mantelit ovat hienontuneet. Jos käytät valmista mantelijauhoa, pelkkä sekoitus riittää. Paloittele / viipaloi mansikat (tai vastaava määrä muuta hedelmää tai marjaa). Jos käytät pakastemansikkaa, viipaloi marjat kohmeisina. Ota taikina hetkeksi lämpenemään, poista pohjan kelmu ja aseta leivinpaperille. Pidä vielä päällimmäinen kelmu paikallaan ja kauli ohueksi levyksi. Reunoja kannattaa ohentaa enemmän kuin keskustaa. Tämän voi myös tehdä ilman kelmua, mutta kelmu auttaa pitämään taikinan kasassa ja kaulimen siistuinä.
Ripottele manteli-jauhoseos kaulitulle taikinalevylle, jätä reunoille muutama sentti tilaa. Asettele mansikkaviipaleet jauhoseoksen päälle ja taittele reunat keskustaa kohti. Laita piiras uudelleen jääkaappiin 30 minuutiksi. Voitele piiraan reunat kermalla ja ripottele koko piiraan päälle demerara-sokeri. Paista 175-asteisen uunin keskitasolla 35-40 minuuttia, kunnes piiras on saanut kauniisti väriä ja mansikoista irtoaa mehua. Tarjoa jäähtyneenä sellaisenaan tai jäätelön kanssa.
In English:
Strawberry galette
I love galette, because it doesn't have to be fancy and perfect. Actually, the more rustic the better! I used Dessert for Two's recipe here. Plums would be lovely, I'm sure, but I used frozen strawberries because those were all I had when the inspiration stroke. That's another nice thing about galette, you can make it with any fruit or berry in season.
110g cold butter
3dl all-purpose flour
1 teaspoon sugar
2-3 tablespoons cold water
Cut the butter into small cubes and rub together with the flour and sugar until the texture resembles wet sand. Add the water one tablespoon at a time. The dough should only just hold together. Cut a large piece of cling film and turn the dough onto it. Put another piece of cling film on top and press the dough into a disk. Place in the fridge for at least 30 minutes - overnight.
1 tablespoon all-purpose flour
2 tablespoon almonds (or almond flour)
3rkl fine cane sugar
8-10 strawberries
1 tablespoon cream (for brushing)
1 tablespoon demerara sugar
Pulse the flour, cane sugar and almonds in a food processor until the almonds are fine crumb. If you use almond flour, just mix it all together. Slice the strawberries. If you use frozen ones slice them before completely thawed. Take the dough from the fridge and let warm up a bit. Take the other piece of cling film off and place the disk onto a piece of baking paper. Keep the other piece of cling film on and press / roll out the disk to 3-5mm thick. You could roll the rims of the dough slightly thinner. You can, of course, do this without the cling film, but it helps to keep the dough together and your rolling pin stays clean. Sprikle the flour-almond-mixture on the rolled dough, keep the edges clear (about 2-3cm). Place the sliced strawberries on top, fold the edges of the dough over and refrigerate for 30 minutes.
Tunnisteet:
baking,
berries,
dessert,
fruit,
hedelmät,
jälkiruoka,
leivonta,
mansikka,
marjat,
pie,
piirakka,
strawberry
16. kesäkuuta 2015
Nutella-juustokakku browniepohjalla
Lunni leipoo-blogissa oli jokin aika sitten tämä Nutella-juustokakku. Todellinen somehitti, ja syystä! No, koska enemmän on AINA enemmän, tuunasin tätä vielä vähän browniepohjalla. Cheesecake + brownie = cheenie? Miksei! Pohja on lähes sama kuin tässä annosbrowniessa ja täyte puolikas alkuperäisestä ohjeesta, määrät riittävät 18- senttiseen kakkuun.
45g voita
60 vaaleaa muscovadoa
35g ruokokidesokeria
30g leivontakaakaota
(ripaus suolaa, jos käytät suolatonta voita)
0,5tl vaniljauutetta
1 iso kananmuna
30g vehnäjauhoja
Voi, sokerit ja kaakao sulatetaan yhteen mikrossa. Tehosta riippuen pari puolen minuutin pätkää täydellä teholla riittävät, tosin välissä on hyvä sekoittaa. Jos seos on kovin kuumaa, anna sen jäähtyä hetken, jotta kananmuna ei ala hyytyä ja lisää sitten joukkoon vaniljauute (ja suola). Riko kananmunan rakenne esim. haarukalla ja sekoita hyvin voi-kaakaoseokseen, kunnes taikina on tasaista. Kääntele jauhot taikinaan, taikinan tulisi olla sileää. Kaada taikina leivinpaperilla vuorattuun irtopohjavuokaan ja tasoita pinta.
Juustokakun silkkinen rakenne onnistuu paremmin, kun juusto, ranskankerma ja kananmuna ovat huoneenlämpöisiä. Ainekset sekoittuvat tällöin paremmin. Kannattaa siis nostaa nämä jääkaapista hyvissä ajoin pöydälle lämpenemään.
200g maustamatonta tuorejuustoa
1 kananmuna
75g ranskankermaa
75g valkosuklaata sulatettuna
50-60g Nutellaa
Tuorejuusto sekoitetaan sileäksi ja lisätään kananmuna. Sekoittaminen on helpompaa, jos munan rakenteen rikkoon ensin esim. haarukalla. Kun seos on sileää, sekoitetaan joukkoon vielä ranskankerma ja sulatettu valkosuklaa. Sekoittamiseen kannattaa käyttää silikonista lastaa, vispilästä tulee massaan ilmakuplia, joiden myötä kakku ei ole tiivis ja silkkinen. Juustomassa kaadetaan brownietaikinan päälle ja pinnalle lusikoidaan Nutellaa. Itse pidän isommista sattumista, joten en lämmittänyt Nutellaa ensin, koristelin pinnan vain veitsen avulla. Hieman juoksevammasta Nutellasta saa tasaisemman kuvion. Kakkua paistetaan 150-asteisen uunin alatasolla 30-35 minuuttia, uunista riippuen. Kun seos on hyytynyt reunoilta mutta keskusta vielä "hytkyy", avaa uunin luukku hetkeksi, ota lämpö pois ja anna kakun olla jälkilämmössä 45-50 minuuttia. Jäähdytä vielä huoneenlämmössä ennen jääkaappiin laittamista. Kakku kannattaa tarjota vasta seuraavana päivänä (tai illalla, jos teet tämän jo aamusta), mutta kannattaa antaa sen lämmetä hetki, jotta maut pääsevät paremmin esille ja kakun tahmean silkkinen rakenne on parhaimmillaan.
In English:
Cheesecake + brownie = cheenie? Well, why not! Brownie layer makes a rich, dense pair for a silky Nutella-flavoured cheesecake. The cheesecake mixture is from a Finnish baking blog Lunni leipoo, I only split it in half and translated it here. This recipe makes one 18cm round cake and a little piece goes a long way.
45g butter
60g light muscovado
35g fine cane sugar (or brown sugar)
30g cocoa
(pinch of salt)
0,5 teaspoon vanilla
1 large egg, lightly whisked
30g plain flour
Preheat oven to 150*C. Mix the butter, sugars and cocoa in a bowl and melt in a mircowave on high heat for 2 x 30 secs, mixing in between. If you use unsalted butter, add the salt and vanilla. Let cool down a little and add the egg into the mixture. Mix until smooth, no need to whisk. Finally, fold the flour into the batter and pour it nto a lined lose-bottomed cake tin.
To make the cheesecake silky smooth, the cheese, crème fraîche and egg should be at room temperature. It's a good idea to take the ingredients out of the fridge in good time before baking.
200g cream cheese
1 egg, lightly whisked
75g crème fraîche
75g white chocolate, melted
50-60g Nutella
Mix the cream cheese with a spatula until the consistency is even and smooth. Add the egg and mix until well combined. Add the crème fraîche and white chocolate and mix until even. Spatula is good for the mixing, since whisking only gets air bubbles into the batter and you don't want that. Silky and dense is what you're going for in this! Pour the cheesecake mixture on top of the brownie batter, smooth the top and drop little (or big, I don't judge) spoonfuls of Nutella on top of the cake. Marble the surface with a knife and bake in the lower part of the oven for 30-35 minutes. When the surface is dry and firm but the center still a bit wobbly, open the oven for a little while, turn off the temperature and let the cake sit in the oven for 45-55 minutes more. Let the cake cool down to room temperature and then place it in the fridge. As usual, cheesecake is best the next day (or in the evening, if baked in the morning). However, let the cake warm up to room temperature before serving to get most out of the flavour and texture.
45g voita
60 vaaleaa muscovadoa
35g ruokokidesokeria
30g leivontakaakaota
(ripaus suolaa, jos käytät suolatonta voita)
0,5tl vaniljauutetta
1 iso kananmuna
30g vehnäjauhoja
Voi, sokerit ja kaakao sulatetaan yhteen mikrossa. Tehosta riippuen pari puolen minuutin pätkää täydellä teholla riittävät, tosin välissä on hyvä sekoittaa. Jos seos on kovin kuumaa, anna sen jäähtyä hetken, jotta kananmuna ei ala hyytyä ja lisää sitten joukkoon vaniljauute (ja suola). Riko kananmunan rakenne esim. haarukalla ja sekoita hyvin voi-kaakaoseokseen, kunnes taikina on tasaista. Kääntele jauhot taikinaan, taikinan tulisi olla sileää. Kaada taikina leivinpaperilla vuorattuun irtopohjavuokaan ja tasoita pinta.
Juustokakun silkkinen rakenne onnistuu paremmin, kun juusto, ranskankerma ja kananmuna ovat huoneenlämpöisiä. Ainekset sekoittuvat tällöin paremmin. Kannattaa siis nostaa nämä jääkaapista hyvissä ajoin pöydälle lämpenemään.
200g maustamatonta tuorejuustoa
1 kananmuna
75g ranskankermaa
75g valkosuklaata sulatettuna
50-60g Nutellaa
Tuorejuusto sekoitetaan sileäksi ja lisätään kananmuna. Sekoittaminen on helpompaa, jos munan rakenteen rikkoon ensin esim. haarukalla. Kun seos on sileää, sekoitetaan joukkoon vielä ranskankerma ja sulatettu valkosuklaa. Sekoittamiseen kannattaa käyttää silikonista lastaa, vispilästä tulee massaan ilmakuplia, joiden myötä kakku ei ole tiivis ja silkkinen. Juustomassa kaadetaan brownietaikinan päälle ja pinnalle lusikoidaan Nutellaa. Itse pidän isommista sattumista, joten en lämmittänyt Nutellaa ensin, koristelin pinnan vain veitsen avulla. Hieman juoksevammasta Nutellasta saa tasaisemman kuvion. Kakkua paistetaan 150-asteisen uunin alatasolla 30-35 minuuttia, uunista riippuen. Kun seos on hyytynyt reunoilta mutta keskusta vielä "hytkyy", avaa uunin luukku hetkeksi, ota lämpö pois ja anna kakun olla jälkilämmössä 45-50 minuuttia. Jäähdytä vielä huoneenlämmössä ennen jääkaappiin laittamista. Kakku kannattaa tarjota vasta seuraavana päivänä (tai illalla, jos teet tämän jo aamusta), mutta kannattaa antaa sen lämmetä hetki, jotta maut pääsevät paremmin esille ja kakun tahmean silkkinen rakenne on parhaimmillaan.
![]() |
| Isompi versio kakusta keksipohjalla / Bigger version of the cake with cookie base |
In English:
Cheesecake + brownie = cheenie? Well, why not! Brownie layer makes a rich, dense pair for a silky Nutella-flavoured cheesecake. The cheesecake mixture is from a Finnish baking blog Lunni leipoo, I only split it in half and translated it here. This recipe makes one 18cm round cake and a little piece goes a long way.
45g butter
60g light muscovado
35g fine cane sugar (or brown sugar)
30g cocoa
(pinch of salt)
0,5 teaspoon vanilla
1 large egg, lightly whisked
30g plain flour
Preheat oven to 150*C. Mix the butter, sugars and cocoa in a bowl and melt in a mircowave on high heat for 2 x 30 secs, mixing in between. If you use unsalted butter, add the salt and vanilla. Let cool down a little and add the egg into the mixture. Mix until smooth, no need to whisk. Finally, fold the flour into the batter and pour it nto a lined lose-bottomed cake tin.
To make the cheesecake silky smooth, the cheese, crème fraîche and egg should be at room temperature. It's a good idea to take the ingredients out of the fridge in good time before baking.
200g cream cheese
1 egg, lightly whisked
75g crème fraîche
75g white chocolate, melted
50-60g Nutella
Mix the cream cheese with a spatula until the consistency is even and smooth. Add the egg and mix until well combined. Add the crème fraîche and white chocolate and mix until even. Spatula is good for the mixing, since whisking only gets air bubbles into the batter and you don't want that. Silky and dense is what you're going for in this! Pour the cheesecake mixture on top of the brownie batter, smooth the top and drop little (or big, I don't judge) spoonfuls of Nutella on top of the cake. Marble the surface with a knife and bake in the lower part of the oven for 30-35 minutes. When the surface is dry and firm but the center still a bit wobbly, open the oven for a little while, turn off the temperature and let the cake sit in the oven for 45-55 minutes more. Let the cake cool down to room temperature and then place it in the fridge. As usual, cheesecake is best the next day (or in the evening, if baked in the morning). However, let the cake warm up to room temperature before serving to get most out of the flavour and texture.
28. maaliskuuta 2015
Granaattiomenaskonssit
Glorian Ruoka & Viini tarjosi tämän herkkureseptin ja voi miten olenkaan iloinen, että tulin testanneeksi! Skonssit ovat loistavaa brunssiruokaa, ja jotenkin sitä tuntee olonsa paljon sivistyneemmäksi niitä syödessään; britit, monarkia, ja kaikki se fancy tea- meininki, tiedättehän? Granaattiomena tuo mukavaa kirpeyttä makeaan taikinaan ja sitruunalla maustettu crème fraîche raikastaa kokonaisuuden mukavasti. Puolitin alkuperäisen ohjeen, tästä määrästä tulee 6-8 skonssia käytettävän muotin koosta riippuen.
2dl vehnäjauhoja
1tl leivinjauhetta
0,25tl suolaa
0,4dl + 2tl demerara-sokeria
25g kylmää voita kuutioina
1dl kuohukermaa, huoneenlämpöisenä
noin 1dl granaattiomenan siemeniä
1 keltuainen, voiteluun
Sekoita jauhot, leivinjauhe, suola ja 0,4dl sokerista keskenään. Nypi voikuutiot kuivien aineiden joukkoon. Seos jää hyvin jauhoiseksi, mutta rakenne muistuttaa hieman kosteaa hiekkaa. Lisää kerma ja granaattiomenan siemenet, sekoita nopeasti taikinaksi. Tarkoitus ei ole vaivata taikinaa, vaan sen tulee olla vain juuri ja juuri sekaisin. Anna taikinan levätä sen aikaa, kun lämmität uunin 225 asteeseen.
Kumoa taikina kevyesti jauhotetulla alustalle ja painele parin sentin paksuiseksi levyksi. Ota taikinasta muotilla (esim. juomalasi) pyöreitä skonsseja ja aseta leivinpaperilla vuoratulle pellille. Voitele skonssit keltuaisella, sirottele päälle loput demerara-sokerista ja paista uunin keskitasossa noin 12 minuuttia, kunnes pinta on kullankeltainen ja pohjat ovat saaneet väriä. Paistoaika riippuu hieman skonssien koosta, joten tarkkaile tilannetta jo 10 minuutin jälkeen. Anna jäähtyä hetki pellillä ja siirrä sen jälkeen ritilän päälle. Skonssit ovat parhaimmillaan haaleina, joten ne kannattaa valmistaa vasta hieman ennen tarjoilua.
100g crème fraîchea (eli ranskankermaa)
vajaa 1rkl tomusokeria
0,5rkl sitruunamehua
Sekoita crème fraîche, tomusokeri ja sitruunamehu keskenään tasaiseksi. Tarkista maku ja lisää sokeria tai mehua tarvittaessa. Tarjoile haaleiden skonssien kanssa.
Kaupasta löytyy monenlaisia ranskankermoja. Suosittelen käyttämään tässä (ja aina) sellaista, jossa on vain kermaa ja hapatetta, jotta maku säilyy raikkaana.
Herkullista viikonloppua!
In English:
Pomegranate scones
This recipe is from a Finnish cooking magazine called Glorian Ruoka & Viini and I'm so glad I tested this! Scones are perfect for brunches and I, for one, always feel very sophisticated while eating them: those Brits with their monarchy and all that fancy tea thing, you know? Pomegranate gives a little tang to this sweet dough and lemon-scented crème fraîche freshens it all up quite nicely (crème fraîche freshens, see what I just did there, pretty clever, eh?). This is half of the original recipe and yields 6-8 scones depending on the wanted size.
2dl all-purpose flour
1 teaspoons baking powder
0,25 teaspoon salt
0,4dl + 2 teaspoons demerara sugar
25g cold butter, diced
1dl double cream, at room temperature
about 1dl pomegranate seeds
1 egg yolk, for brushing
Whisk together the flour, baking powder, salt and 0,4dl sugar. Add the butter cubes and rub the butter into the dry ingredients. The mixture will stay pretty dry, but the consistency should be like slightly wet sand. Add the cream and pomegranate seeds and, working quickly by hand, bring the dough together. You shouldn't knead the dough, only make sure it's all mixed together. Let the dough rest while you preheat the oven to 225*C.
Sprinkle a bit of flour on your working top and pat the dough to 2cm thick disk. Take little rounds of the dough with a mould (e.g. drinking glass, about 5cm) and place them to a baking tray lined with baking paper. Brush the scones with egg yolk, sprinkle the rest of the demerara on top and bake in the middle of the oven for about 12 minutes. The scones should be golden on top and have a little colour at the bottom. Baking time depends on the size of the scones, so check them after 10 minutes. Let rest on the baking tray for a minute or so and place on a wire rack to cool down. Scones are best when still slightly warm so make these just before serving.
100g crème fraîche
about 1 tablespoon powdered sugar
0,5 tablespoon lemon juice
Mix all the ingredients well together, add sugar or juice if needed, to taste. Serve with the warm scones.
There are all sorts of crème fraîche at the markets. I recommend you use the kind that has only cream and the needed bacteria. So basically just two ingredients. Everything else is just added stuff, that shouldn't be there.
Have a lovely weekend!
2dl vehnäjauhoja
1tl leivinjauhetta
0,25tl suolaa
0,4dl + 2tl demerara-sokeria
25g kylmää voita kuutioina
1dl kuohukermaa, huoneenlämpöisenä
noin 1dl granaattiomenan siemeniä
1 keltuainen, voiteluun
Sekoita jauhot, leivinjauhe, suola ja 0,4dl sokerista keskenään. Nypi voikuutiot kuivien aineiden joukkoon. Seos jää hyvin jauhoiseksi, mutta rakenne muistuttaa hieman kosteaa hiekkaa. Lisää kerma ja granaattiomenan siemenet, sekoita nopeasti taikinaksi. Tarkoitus ei ole vaivata taikinaa, vaan sen tulee olla vain juuri ja juuri sekaisin. Anna taikinan levätä sen aikaa, kun lämmität uunin 225 asteeseen.
Kumoa taikina kevyesti jauhotetulla alustalle ja painele parin sentin paksuiseksi levyksi. Ota taikinasta muotilla (esim. juomalasi) pyöreitä skonsseja ja aseta leivinpaperilla vuoratulle pellille. Voitele skonssit keltuaisella, sirottele päälle loput demerara-sokerista ja paista uunin keskitasossa noin 12 minuuttia, kunnes pinta on kullankeltainen ja pohjat ovat saaneet väriä. Paistoaika riippuu hieman skonssien koosta, joten tarkkaile tilannetta jo 10 minuutin jälkeen. Anna jäähtyä hetki pellillä ja siirrä sen jälkeen ritilän päälle. Skonssit ovat parhaimmillaan haaleina, joten ne kannattaa valmistaa vasta hieman ennen tarjoilua.
100g crème fraîchea (eli ranskankermaa)
vajaa 1rkl tomusokeria
0,5rkl sitruunamehua
Sekoita crème fraîche, tomusokeri ja sitruunamehu keskenään tasaiseksi. Tarkista maku ja lisää sokeria tai mehua tarvittaessa. Tarjoile haaleiden skonssien kanssa.
Kaupasta löytyy monenlaisia ranskankermoja. Suosittelen käyttämään tässä (ja aina) sellaista, jossa on vain kermaa ja hapatetta, jotta maku säilyy raikkaana.
Herkullista viikonloppua!
In English:
Pomegranate scones
This recipe is from a Finnish cooking magazine called Glorian Ruoka & Viini and I'm so glad I tested this! Scones are perfect for brunches and I, for one, always feel very sophisticated while eating them: those Brits with their monarchy and all that fancy tea thing, you know? Pomegranate gives a little tang to this sweet dough and lemon-scented crème fraîche freshens it all up quite nicely (crème fraîche freshens, see what I just did there, pretty clever, eh?). This is half of the original recipe and yields 6-8 scones depending on the wanted size.
2dl all-purpose flour
1 teaspoons baking powder
0,25 teaspoon salt
0,4dl + 2 teaspoons demerara sugar
25g cold butter, diced
1dl double cream, at room temperature
about 1dl pomegranate seeds
1 egg yolk, for brushing
Whisk together the flour, baking powder, salt and 0,4dl sugar. Add the butter cubes and rub the butter into the dry ingredients. The mixture will stay pretty dry, but the consistency should be like slightly wet sand. Add the cream and pomegranate seeds and, working quickly by hand, bring the dough together. You shouldn't knead the dough, only make sure it's all mixed together. Let the dough rest while you preheat the oven to 225*C.
Sprinkle a bit of flour on your working top and pat the dough to 2cm thick disk. Take little rounds of the dough with a mould (e.g. drinking glass, about 5cm) and place them to a baking tray lined with baking paper. Brush the scones with egg yolk, sprinkle the rest of the demerara on top and bake in the middle of the oven for about 12 minutes. The scones should be golden on top and have a little colour at the bottom. Baking time depends on the size of the scones, so check them after 10 minutes. Let rest on the baking tray for a minute or so and place on a wire rack to cool down. Scones are best when still slightly warm so make these just before serving.
100g crème fraîche
about 1 tablespoon powdered sugar
0,5 tablespoon lemon juice
Mix all the ingredients well together, add sugar or juice if needed, to taste. Serve with the warm scones.
There are all sorts of crème fraîche at the markets. I recommend you use the kind that has only cream and the needed bacteria. So basically just two ingredients. Everything else is just added stuff, that shouldn't be there.
Have a lovely weekend!
2. maaliskuuta 2015
Cookies & cream -juustokakku
Suklaakekseillä maustettu juustokakku - kyllä kiitos! Tämä herkku löytyi Maku-lehden uusimmasta numerosta (1/2015) ja voi miten iloinen olenkaan siitä! Kakku nousi kyllä suoraan oman juustokakkujen top-listani kärkeen, ja taitaa pysyä siellä aika pitkään kaikessa makeudessaan. Täyte on pehmeän silkkistä, mutta samalla täyttä tavaraa. Kekseinä kannattaa ehdottomasti käyttää todella tummia ja suklaisia täytekeksejä. Dominot ovat kyllä hyviä, mutta jäävät tässä herkussa liian pliisuiksi. Koska alkuperäinen resepti on iso (annosmäärä 16kpl), tein vain noin puolikkaan. Siitä olisi riittänyt vähemmän sivistyneen kokoisia annoksia kuudelle. Tai useampi annos kahdelle, kuten tuli testattua.
120g tummia täytekeksejä (Dops Brownie tai Oreo)
25-30g voita, sulatettuna
200g maustamatonta tuorejuustoa (ei light-versioita), huoneenlämpöisenä
200g kondensoitua maitoa (eli puoli tölkkiä)
2 kananmunaa
0,5tl vaniljasokeria tai pari tippaa vaniljauutetta
60g tummia täytekeksejä rouhittuna
Pohjaan tulevat keksit (120g) murskataan keittiökoneella tai käsin. Jos sähköisiä vempaimia ei löydy, apuna toimii mainiosti esim. pakastepussi + kaulin tai muusisurvin. Sulatettu voi yhdistetään keksimuruihin ja painellaan seos leivinpaperilla vuoratun vuoan pohjalle ja reunoille. Tästä määrästä riittää 18cm vuoan reunoille hyvin, 20cm vuoan reinoille vähän vähemmän. Keksien täytteestä tulee rasvaisuutta, joten voin määrän ei tarvitse olla kovinkaan suuri. Riittää, kun seos tiivistyy ja pysyy kasassa. Ruokalusikka on hyvä apu seoksen levityksessä ja painelussa. Kun pohja on tiivis, laitetaan vuoka pakastimeen tai jääkaappiin täytteen valmistuksen ajaksi.
Huoneenlämpöinen tuorejuusto vatkataan notkeaksi ja sekoitetaan joukkoon kondensoitu maito, kananmunat ja vanilja. Itse vatkasin täytettä pienellä nopeudella jokaisen lisäyksen välissä. Tarkoitus ei ole vaahdottaa massaa, ainoastaan saada se tasaisesti sekaisin. Lopuksi lisätään rouhitut keksinpalat. Rouhe saa olla epätasaista, isommat sattumat ovat toivottuja! Täyte kaadetaan keksipohjan päälle, ja paistetaan kakkua 150-asteisen uunin alatasossa noin 30-35 minuuttia. Tämän jälkeen uuni käännetään pois päältä, ja annetaan kakun paistua jälkilämmössä vielä noin 40 minuuttia. Annetaan jäähtyä huoneenlämpöiseksi ja siirretään jääkappiin, mieluiten päivän tai yön ajaksi
Täytteen rakenteen taika piilee paistossa. Oman uunin tunteminen ja muutama testikerta saattaa siis olla tarpeen. Oma kakkuni onnistui tällä metodilla: noin 20 minuuttia 150 asteessa, noin 10 minuuttia 100 asteessa ja noin 40 minuuttia jälkilämmössä. Kakku on valmis jälkilämpöön, kun reunat ovat hyytyneet, mutta keskusta on vielä höllyvää. Vuokaa voi varovasti hytkyttää, sillä koska kakku ei juurikaan kohoa, ei myöskään ilmavuus mene pilalle liikuttelusta. Kakun ei tarvitse olla täysin paikallaan pysyvä ja kiinteä uunista pois otettaessa, vaan rakenne tiivistyy vielä jääkaapissa. Ennen tarjoilua kakku kannattaa nostaa hetkeksi huoneenlämpöön, jotta juustotäyte on mahdollisimman silkkinen.
Jos kakkuvuoan reunoja ei vuoraa leivinpaperilla, suosittelen irrottamaan reunat varovasti hammastikun tai palettiveitsen avulla. Muutoin kakku helposti repeää reunaa irrottaessa.
Ylijäävän kondensoidun maidon voi käyttää vaikka näihin juustokakkuihin tai tähän jäätelöön.
In English:
Cookies & cream cheesecake
Cheesecake with cookies - yes please! This recipe is from a Finnish cooking and baking magazine called Maku (taste) and I'm so happy I found it! The cake made it to the top of my cheesecake list and I have a feeling it'll stay there for quite some time in all its sweetness. The filling is silky smooth but packed with flavour. Oreo cookies are the best for this, but since they're not very common in Finland, I used a bit bigger but similar Dops Brownie- cookies. The original recipe makes 16 portions, so I divided it and made the cake with roughly half of the original amounts. It would have made six not-that-sophisticated- sized portions but since there was only two of us, we got multiple portions, ha!
120g Oreos
25-30g butter, melted
200g cream cheese (no light versions), at room temperature
200g condensed milk
2 eggs
0,5 teaspoons vanilla sugar or few drops of vanilla
60g Oreos, roughly chopped
Preheat oven to 150*C. Crush the cookies (120g) and mix together with the melted butter. The cookie filling will help to keep the mixture together, so you won't need a lot of butter. Press the cookie mixture to the bottom and rims of a lined 18cm or 20cm cake tin. Place the tin in the freezer or fridge while you make the filling.
Whisk the cream cheese for a minute or so. Add the condensed milk, eggs and vanilla (sugar). I recommend you whisk a little at slow speed between every addition to make sure the texture is smooth. Finally, add the chopped cookies and pour the cheese mixture on the cooled cookie crust. Bake the cake on the lowest part of the oven for about 30-35 minutes, turn the heat off and continue baking for about 40 minutes. Let the cake cool down at room temperature and place it in the fridge for the day / overnight.
The consistency of the filling depends on the baking. My cake was baked like this: about 20 minutes at 150*C, about 10 minutes at 100*C and 40 minutes with no heat. You can turn the heat off once the edges of the cake are firm but the center is still wobbly. The consistence doesn't need to be (and shouldn't be) completely firm once the cake goes into the fridge, it will set more when it gets cold. To make sure the filling is nice and silky take the cake out of the fridge for 20-30 minutes before serving. If you don't line the sides of the cake tin with baking paper, use a palette knife, thin spatula or a wooden toothpick to loosen the edges. Otherwise the cake will easily tear when the rim is opened. No effect on taste but such a cruel crime for the pretty little thing.
P.S. Tällä ei ole tekemistä kakkujen kanssa, mutta kuinka mahtava olikaan Marigold IceUnityn suoritus viikonloppuna muodostelmaluistenlun SM-kisoissa! Maailmanennätyspisteet, maailman parasta luistelua, ei voi kuin ihailla!
This has nothing to do with cakes and baking, but I can't get over the fact of how amazing synchronized skating team Marigold IceUnity was on the nationals this weekend! They got world record -breaking score, such perfection!
120g tummia täytekeksejä (Dops Brownie tai Oreo)
25-30g voita, sulatettuna
200g maustamatonta tuorejuustoa (ei light-versioita), huoneenlämpöisenä
200g kondensoitua maitoa (eli puoli tölkkiä)
2 kananmunaa
0,5tl vaniljasokeria tai pari tippaa vaniljauutetta
60g tummia täytekeksejä rouhittuna
Pohjaan tulevat keksit (120g) murskataan keittiökoneella tai käsin. Jos sähköisiä vempaimia ei löydy, apuna toimii mainiosti esim. pakastepussi + kaulin tai muusisurvin. Sulatettu voi yhdistetään keksimuruihin ja painellaan seos leivinpaperilla vuoratun vuoan pohjalle ja reunoille. Tästä määrästä riittää 18cm vuoan reunoille hyvin, 20cm vuoan reinoille vähän vähemmän. Keksien täytteestä tulee rasvaisuutta, joten voin määrän ei tarvitse olla kovinkaan suuri. Riittää, kun seos tiivistyy ja pysyy kasassa. Ruokalusikka on hyvä apu seoksen levityksessä ja painelussa. Kun pohja on tiivis, laitetaan vuoka pakastimeen tai jääkaappiin täytteen valmistuksen ajaksi.
Huoneenlämpöinen tuorejuusto vatkataan notkeaksi ja sekoitetaan joukkoon kondensoitu maito, kananmunat ja vanilja. Itse vatkasin täytettä pienellä nopeudella jokaisen lisäyksen välissä. Tarkoitus ei ole vaahdottaa massaa, ainoastaan saada se tasaisesti sekaisin. Lopuksi lisätään rouhitut keksinpalat. Rouhe saa olla epätasaista, isommat sattumat ovat toivottuja! Täyte kaadetaan keksipohjan päälle, ja paistetaan kakkua 150-asteisen uunin alatasossa noin 30-35 minuuttia. Tämän jälkeen uuni käännetään pois päältä, ja annetaan kakun paistua jälkilämmössä vielä noin 40 minuuttia. Annetaan jäähtyä huoneenlämpöiseksi ja siirretään jääkappiin, mieluiten päivän tai yön ajaksi
Täytteen rakenteen taika piilee paistossa. Oman uunin tunteminen ja muutama testikerta saattaa siis olla tarpeen. Oma kakkuni onnistui tällä metodilla: noin 20 minuuttia 150 asteessa, noin 10 minuuttia 100 asteessa ja noin 40 minuuttia jälkilämmössä. Kakku on valmis jälkilämpöön, kun reunat ovat hyytyneet, mutta keskusta on vielä höllyvää. Vuokaa voi varovasti hytkyttää, sillä koska kakku ei juurikaan kohoa, ei myöskään ilmavuus mene pilalle liikuttelusta. Kakun ei tarvitse olla täysin paikallaan pysyvä ja kiinteä uunista pois otettaessa, vaan rakenne tiivistyy vielä jääkaapissa. Ennen tarjoilua kakku kannattaa nostaa hetkeksi huoneenlämpöön, jotta juustotäyte on mahdollisimman silkkinen.
Jos kakkuvuoan reunoja ei vuoraa leivinpaperilla, suosittelen irrottamaan reunat varovasti hammastikun tai palettiveitsen avulla. Muutoin kakku helposti repeää reunaa irrottaessa.
Ylijäävän kondensoidun maidon voi käyttää vaikka näihin juustokakkuihin tai tähän jäätelöön.
In English:
Cookies & cream cheesecake
Cheesecake with cookies - yes please! This recipe is from a Finnish cooking and baking magazine called Maku (taste) and I'm so happy I found it! The cake made it to the top of my cheesecake list and I have a feeling it'll stay there for quite some time in all its sweetness. The filling is silky smooth but packed with flavour. Oreo cookies are the best for this, but since they're not very common in Finland, I used a bit bigger but similar Dops Brownie- cookies. The original recipe makes 16 portions, so I divided it and made the cake with roughly half of the original amounts. It would have made six not-that-sophisticated- sized portions but since there was only two of us, we got multiple portions, ha!
120g Oreos
25-30g butter, melted
200g cream cheese (no light versions), at room temperature
200g condensed milk
2 eggs
0,5 teaspoons vanilla sugar or few drops of vanilla
60g Oreos, roughly chopped
Preheat oven to 150*C. Crush the cookies (120g) and mix together with the melted butter. The cookie filling will help to keep the mixture together, so you won't need a lot of butter. Press the cookie mixture to the bottom and rims of a lined 18cm or 20cm cake tin. Place the tin in the freezer or fridge while you make the filling.
Whisk the cream cheese for a minute or so. Add the condensed milk, eggs and vanilla (sugar). I recommend you whisk a little at slow speed between every addition to make sure the texture is smooth. Finally, add the chopped cookies and pour the cheese mixture on the cooled cookie crust. Bake the cake on the lowest part of the oven for about 30-35 minutes, turn the heat off and continue baking for about 40 minutes. Let the cake cool down at room temperature and place it in the fridge for the day / overnight.
The consistency of the filling depends on the baking. My cake was baked like this: about 20 minutes at 150*C, about 10 minutes at 100*C and 40 minutes with no heat. You can turn the heat off once the edges of the cake are firm but the center is still wobbly. The consistence doesn't need to be (and shouldn't be) completely firm once the cake goes into the fridge, it will set more when it gets cold. To make sure the filling is nice and silky take the cake out of the fridge for 20-30 minutes before serving. If you don't line the sides of the cake tin with baking paper, use a palette knife, thin spatula or a wooden toothpick to loosen the edges. Otherwise the cake will easily tear when the rim is opened. No effect on taste but such a cruel crime for the pretty little thing.
P.S. Tällä ei ole tekemistä kakkujen kanssa, mutta kuinka mahtava olikaan Marigold IceUnityn suoritus viikonloppuna muodostelmaluistenlun SM-kisoissa! Maailmanennätyspisteet, maailman parasta luistelua, ei voi kuin ihailla!
![]() |
| (kuva Tero Wester / MLSM2015) (picture by Tero Wester / Finnish Nationals 2015) |
This has nothing to do with cakes and baking, but I can't get over the fact of how amazing synchronized skating team Marigold IceUnity was on the nationals this weekend! They got world record -breaking score, such perfection!
25. helmikuuta 2015
Pehmeät kookossokerikeksit
Reilun viikon mittainen keksihampaan kolotus päättyi viimein, kun löysin kivan, nopean ja vähän erilaisen cookie- reseptin. Ilon tarjosi - jälleen kerran - Dessert for Two -blogi. En malta odottaa, milloin saan Christinan kirjan käsiini. Tilasin sen jo kerran muutama viikko sitten ja kaikki näytti hyvältä - kunnes öinen sähköposti ilmoitti (vähemmän ystävällisesti), että kirja on loppunut eikä sitä tulla minulle toimittamaan tilaukseni mukaisesti sittenkään, kun kirja saadaan valikoimaan. Kysynpä vaan, miten kirja voi loppua, kun se on vasta ennakkotilattavissa?! No, nyt olen sormet ja varpaat ristissä tehnyt uuden tilauksen ja ainakin vielä, vuorokauden jälkeen, näyttää lupaavalta.
Mutta itse asiaan. Maistoin kookossokeria vasta jokunen aika sitten ensimmäistä kertaa. Kookos ei tuoksuna eikä hiutaleina ole koskaan kuulunut suosikkeihini (Bountyt ovat siis jääneet karkkihyllyyn), joten on tullut kartettua sitä kaikissa muissakin muodoissa. Tyhmää, tiedän. Kookossokerin syvään makuun tykästyin kuitenkin heti. Niin, mistä sokerista nyt en sitten pitäisi... Nämä keksit ovat mukavan pehmoisia ja kookossokerin vuoksi ne maistuvat oikeastaan vähän mausteisilta. Vaalea muscovadokin tai fariinisokeri voisi hyvin toimia ja ehkä intiaanisokeri, mutta siitä minulla ei ole kokemusta, joten testatkaa omalla riskillä. Ainahan sen keksitaikinan voi syödä raakana, jos paistettu testikappale on rakenteeltaan katastrofi. Tai vaikkei olisikaan.
80-90g voita, huoneenlämpöisenä
1,25d kookossokeria
1 (iso) kananmuna
0,5tl vaniljauutetta
vajaa 2,5dl vehnäjauhoja
0,5-1tl soodaa
(ripaus suolaa, jos käytät suolatonta voita)
Voi ja sokeri vaahdotetaan kevyesti, lisätään kananmuna ja vanilja ja vatkataan, kunnes massa on tasaista. Kuivat aineet sekoitetaan keskenään ja lisätään voi-sokerivaahtoon. Sihtaamisesta ei ole haittaa, mutta ilmankin selviää. Taikinaa vatkataan sen verran, että kaikki ainekset sekoittuvat hyvin, mutta ei enempää. Taikina nostellaan nokareina leivinpaperilla vuoratulle pellille ja paistetaan 185-190- asteisen uunin keskitasossa 8-10 minuuttia. Keksien on tarkoitus jäädä pehmeiksi, joten ne ovat valmiita kun reunat ovat saaneet vähän väriä ja pinta tuntuu kuivalta. Keksien kannattaa antaa olla minuutin verran vielä kuumalla pellillä ennen kuin ne siirretään ritilän päälle jäähtymään. Tästä määrästä tulee noin 12 keksiä, nokareiden koko saa siis olla reilu. Toki voi tehdä myös pienempiä, mutta kokomuutos kannattaa silloin huomioida paistoajassa.
Keksit ovat hyviä jo sellaisenaan vaikka iltapäiväteen tai -kahvin kanssa, mutta niistä voi tehdä myös whoopie pie- tyyppisiä leivoksia. Esimerkiksi Nutella, maapähkinävoi tai paksu kinuski ovat aika mainioita pareja. Helpoin paksu kinuski löytyy suoraan kaupan hyllyltä karamelisoidun kondenssimaidon muodossa (ruskealla etiketillä varustettu peltipurkki), mutta kinuskin voi tehdä myös itse näppärästi mikrossa esimerkiksi näistä juustokakuista ylijääneestä kondensoidusta maidosta (puoli tölkkiä). Näppäryys tarkoittaa tässä nyt sitä, että purkkia ei tarvitse keittää 1,5 tuntia. Mikroa täytyy vahtia ihan koko ajan, suosittelen max 30 sekunnin kuumennusta kerrallaan ja riittävän suurta kulhoa (puolen litran kulho oli aika rajoilla puolikkaan tölkin kanssa). Maitotiivistettä tulee myös sekoittaa joka välissä, ettei se karamelisoidu epätasaisesti. Käytä patalappuja tai -kintaita, kinuski on todella kuumaa kamaa valmiina. Kannattaa myös jättää seos tavallista kinuskia vaaleammaksi, koska jäähtyessään se sakenee entisestään ja kinuskista ei ole (kovin paljoa) iloa, jos sen koostumus ei syöntilämpöisenä ole enää missään määrin levitettävää. Jos kaikkia keksejä ei syödä heti, kannattaa ne peittää kelmulla, jotta rakenne säilyy pehmeänä. Mutta se nyt on vähän hassu ajatus. Paitsi jos olet yksin syömässä. Eikä ole kovin akuutti makeannälkä. Ehkä.
In English:
These soft coconut sugar cookies are straight from Dessert for Two, so please check the recipe and how to from there. However, I upgraded the lovely little things to lovely bigger things - whoopie pie -sort of deliciousness! Sandwich two soft and cooled cookies with Nutella, peanut butter or thick caramel / dulce de leche and voilà!
The easiest thick caramel can be found in jars (the caramelized condensed milk), but you can make the caramel from regular sweetened condensed milk in the microwave, as well. Great use for the half a jar of leftover from these cheesecake jars. However, do not take your eyes off the microwave for a second! Cook for max 30 seconds at a time, stirring well in between, since the milk is a fickle little thing when heated (and some other adjectives might be used if you have to clean your microwave after a boiling over -kind of catastrophe). And use a bowl that's big enough. Half a liter was a bit iffy with 200g of the condensed milk, so go big or not at all. I recommend not cooking the caramel too brown, but leave it quite light since it thickens even more as it cools down. (Read between the lines: this stuff is really hot once done, so don't taste it or take the bowl out of the microwave without oven mittens!) If the cookies don't get eaten straight away, keep them covered to keep them soft. But that's a bit funny scenario. Unless you're alone. And you don't have very acute cravings. Maybe.
Mutta itse asiaan. Maistoin kookossokeria vasta jokunen aika sitten ensimmäistä kertaa. Kookos ei tuoksuna eikä hiutaleina ole koskaan kuulunut suosikkeihini (Bountyt ovat siis jääneet karkkihyllyyn), joten on tullut kartettua sitä kaikissa muissakin muodoissa. Tyhmää, tiedän. Kookossokerin syvään makuun tykästyin kuitenkin heti. Niin, mistä sokerista nyt en sitten pitäisi... Nämä keksit ovat mukavan pehmoisia ja kookossokerin vuoksi ne maistuvat oikeastaan vähän mausteisilta. Vaalea muscovadokin tai fariinisokeri voisi hyvin toimia ja ehkä intiaanisokeri, mutta siitä minulla ei ole kokemusta, joten testatkaa omalla riskillä. Ainahan sen keksitaikinan voi syödä raakana, jos paistettu testikappale on rakenteeltaan katastrofi. Tai vaikkei olisikaan.
80-90g voita, huoneenlämpöisenä
1,25d kookossokeria
1 (iso) kananmuna
0,5tl vaniljauutetta
vajaa 2,5dl vehnäjauhoja
0,5-1tl soodaa
(ripaus suolaa, jos käytät suolatonta voita)
Voi ja sokeri vaahdotetaan kevyesti, lisätään kananmuna ja vanilja ja vatkataan, kunnes massa on tasaista. Kuivat aineet sekoitetaan keskenään ja lisätään voi-sokerivaahtoon. Sihtaamisesta ei ole haittaa, mutta ilmankin selviää. Taikinaa vatkataan sen verran, että kaikki ainekset sekoittuvat hyvin, mutta ei enempää. Taikina nostellaan nokareina leivinpaperilla vuoratulle pellille ja paistetaan 185-190- asteisen uunin keskitasossa 8-10 minuuttia. Keksien on tarkoitus jäädä pehmeiksi, joten ne ovat valmiita kun reunat ovat saaneet vähän väriä ja pinta tuntuu kuivalta. Keksien kannattaa antaa olla minuutin verran vielä kuumalla pellillä ennen kuin ne siirretään ritilän päälle jäähtymään. Tästä määrästä tulee noin 12 keksiä, nokareiden koko saa siis olla reilu. Toki voi tehdä myös pienempiä, mutta kokomuutos kannattaa silloin huomioida paistoajassa.
Keksit ovat hyviä jo sellaisenaan vaikka iltapäiväteen tai -kahvin kanssa, mutta niistä voi tehdä myös whoopie pie- tyyppisiä leivoksia. Esimerkiksi Nutella, maapähkinävoi tai paksu kinuski ovat aika mainioita pareja. Helpoin paksu kinuski löytyy suoraan kaupan hyllyltä karamelisoidun kondenssimaidon muodossa (ruskealla etiketillä varustettu peltipurkki), mutta kinuskin voi tehdä myös itse näppärästi mikrossa esimerkiksi näistä juustokakuista ylijääneestä kondensoidusta maidosta (puoli tölkkiä). Näppäryys tarkoittaa tässä nyt sitä, että purkkia ei tarvitse keittää 1,5 tuntia. Mikroa täytyy vahtia ihan koko ajan, suosittelen max 30 sekunnin kuumennusta kerrallaan ja riittävän suurta kulhoa (puolen litran kulho oli aika rajoilla puolikkaan tölkin kanssa). Maitotiivistettä tulee myös sekoittaa joka välissä, ettei se karamelisoidu epätasaisesti. Käytä patalappuja tai -kintaita, kinuski on todella kuumaa kamaa valmiina. Kannattaa myös jättää seos tavallista kinuskia vaaleammaksi, koska jäähtyessään se sakenee entisestään ja kinuskista ei ole (kovin paljoa) iloa, jos sen koostumus ei syöntilämpöisenä ole enää missään määrin levitettävää. Jos kaikkia keksejä ei syödä heti, kannattaa ne peittää kelmulla, jotta rakenne säilyy pehmeänä. Mutta se nyt on vähän hassu ajatus. Paitsi jos olet yksin syömässä. Eikä ole kovin akuutti makeannälkä. Ehkä.
![]() |
| Kestoleivinpaperi ei todella ole se fotogeenisin, mutta ah-niin-näppärä! |
In English:
These soft coconut sugar cookies are straight from Dessert for Two, so please check the recipe and how to from there. However, I upgraded the lovely little things to lovely bigger things - whoopie pie -sort of deliciousness! Sandwich two soft and cooled cookies with Nutella, peanut butter or thick caramel / dulce de leche and voilà!
The easiest thick caramel can be found in jars (the caramelized condensed milk), but you can make the caramel from regular sweetened condensed milk in the microwave, as well. Great use for the half a jar of leftover from these cheesecake jars. However, do not take your eyes off the microwave for a second! Cook for max 30 seconds at a time, stirring well in between, since the milk is a fickle little thing when heated (and some other adjectives might be used if you have to clean your microwave after a boiling over -kind of catastrophe). And use a bowl that's big enough. Half a liter was a bit iffy with 200g of the condensed milk, so go big or not at all. I recommend not cooking the caramel too brown, but leave it quite light since it thickens even more as it cools down. (Read between the lines: this stuff is really hot once done, so don't taste it or take the bowl out of the microwave without oven mittens!) If the cookies don't get eaten straight away, keep them covered to keep them soft. But that's a bit funny scenario. Unless you're alone. And you don't have very acute cravings. Maybe.
Tilaa:
Blogitekstit (Atom)